

My friend walked into my apartment last month and said "this looks like a real adult lives here." Highest compliment I have ever received. The change that earned it was tiny: arranging food like it belonged in the room, not just on it. I started photographing weekday breakfasts the same way I set the table for guests and the whole place felt warmer.
These ideas lean Nordic minimal with a few rustic touches. Most props are under $50, with one or two pieces worth splurging on if you like. They work for kitchen counters, small dining nooks, breakfast trays, or any corner you want to turn into an easy photo moment.
Rustic Breakfast Tray For A Nordic Kitchen
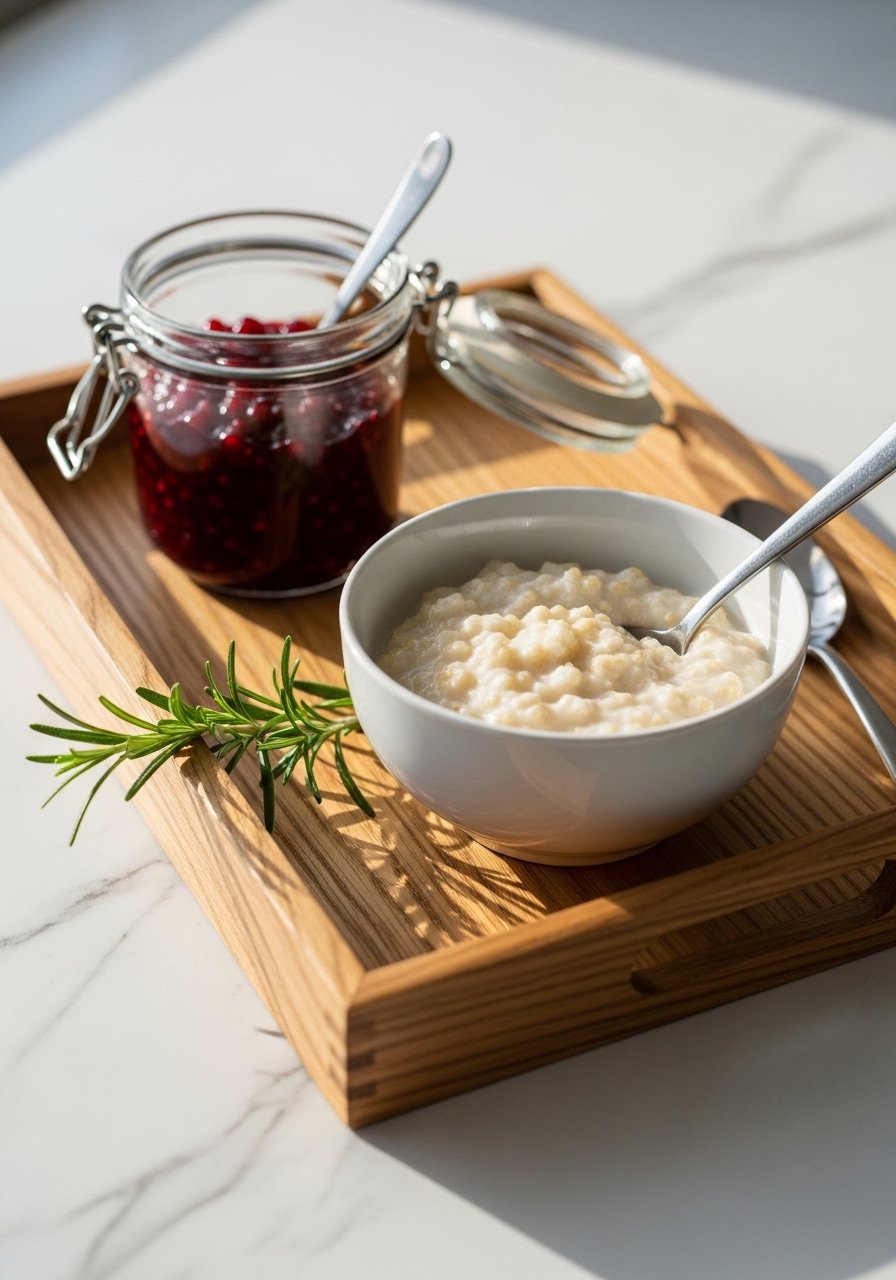
The moment I put breakfast on a low wooden tray the scene read intentional. A tray groups unrelated items so the eye stops wandering. Aim for a 12 by 16 inch tray for two people, or 18 by 24 if you want more staging room. I use a simple wood serving tray and a tiny ceramic jam jar to keep things tactile. Budget is $20 to $60 depending on wood and finish. A common mistake is overfilling the tray. Leave negative space like you would in a painting. One detail people miss is height contrast, so add a folded linen napkin under the bowl to lift it about one inch for better shadows.
Open-Faced Rye Sandwich Flat Lay For Tabletop
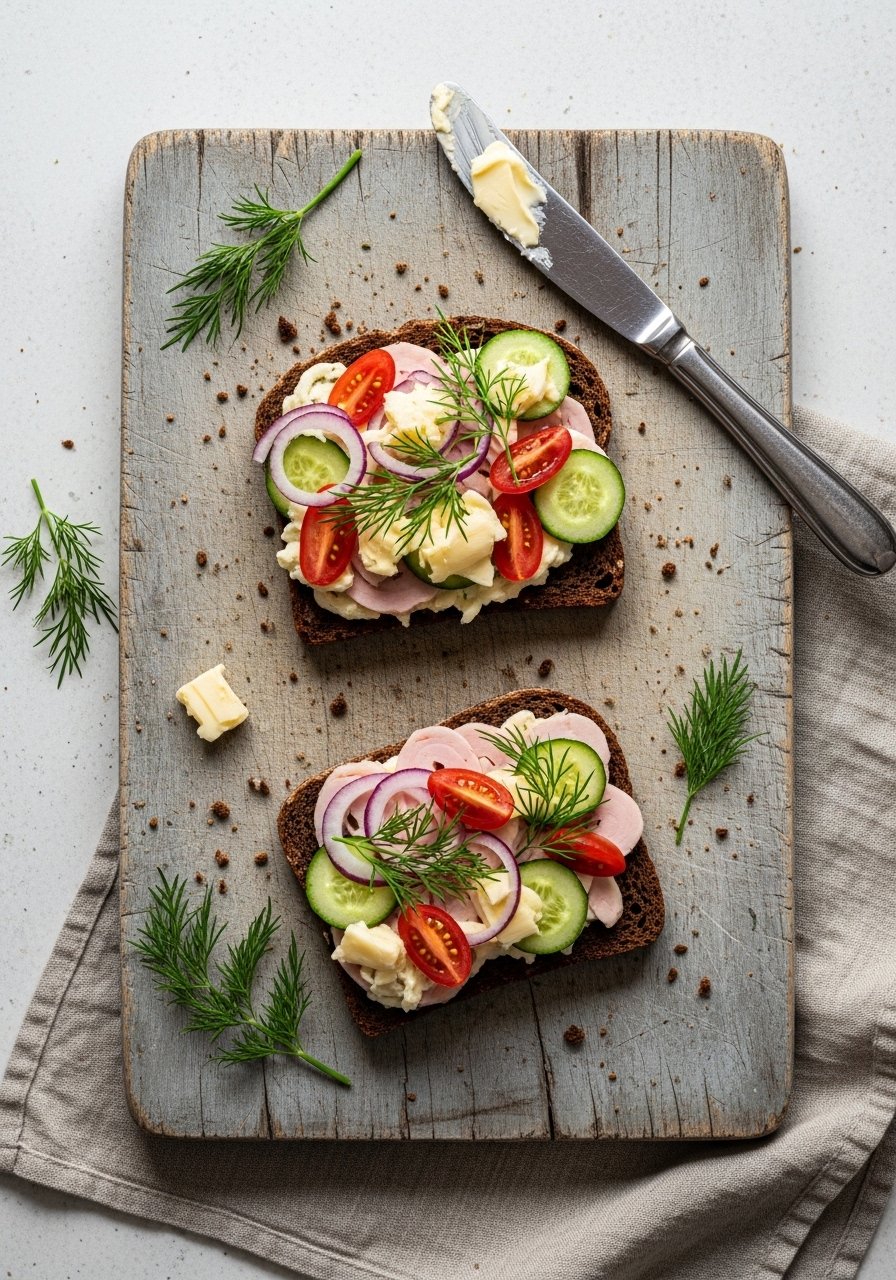
Open-faced sandwiches photograph beautifully because of the layers. Start with a 10 by 14 inch cutting board, place the bread slightly off-center, and build toppings in thirds across the slice for visual rhythm. My go-to board is a large acacia cutting board. Keep toppings simple: pickled cucumber, radish, and a single herb sprig. Most people try to make each sandwich perfect. That is the mistake. Slight mess, a tiny butter smear, and a few crumbs look more real. If your light is cool, use a thin slice of lemon or a warm wood board to add a touch of warmth without changing the food.
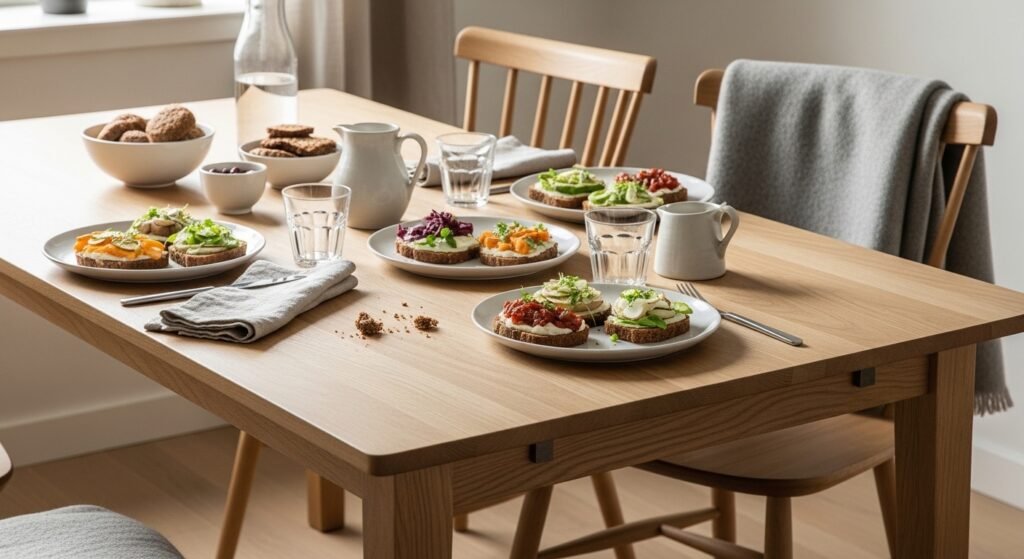
Minimal Table Setting With Neutral Linens
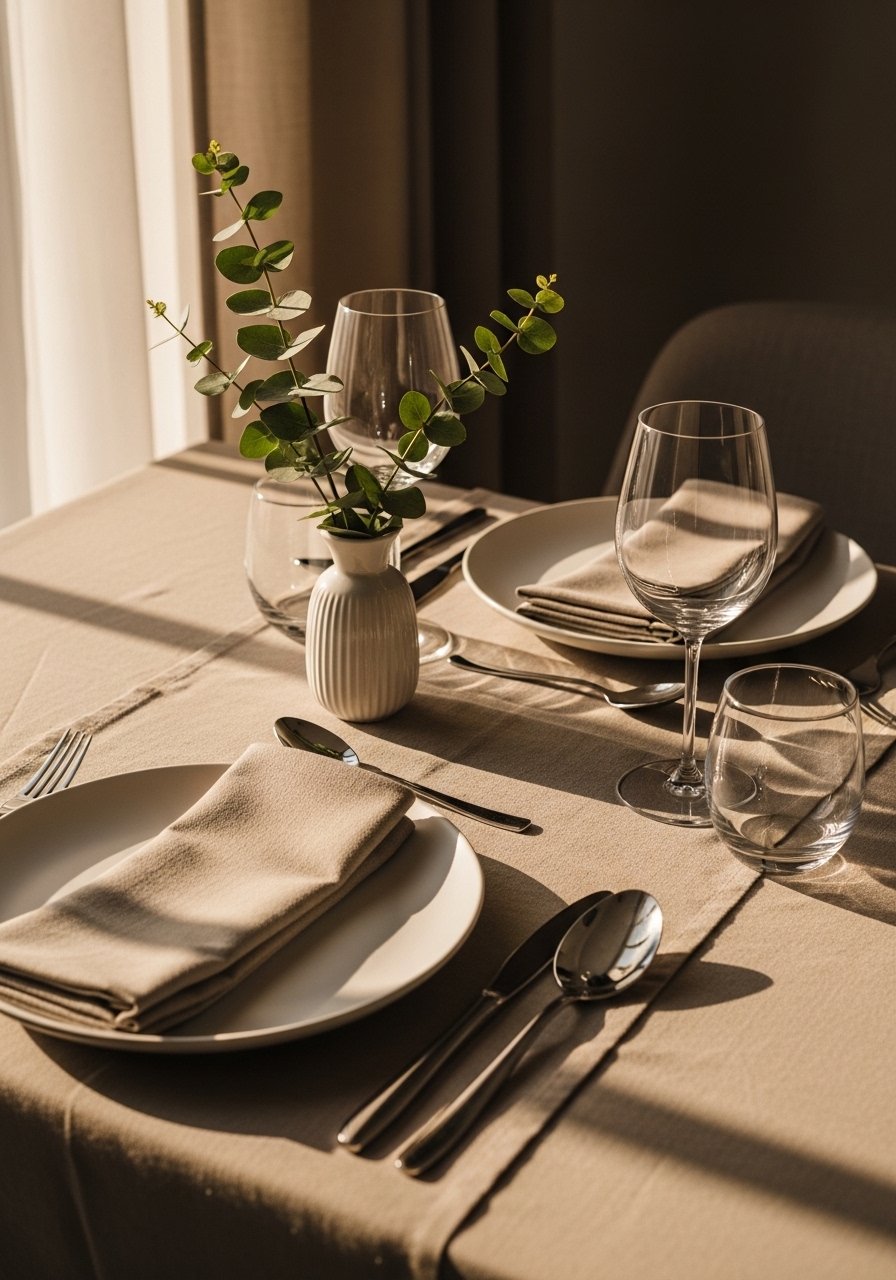
I stopped buying patterned napkins years ago. Neutral linen gives food the starring role and the table stays Nordic. Use 22-inch linen napkins folded casually and place them under the plate, not on top. I pair a set of linen napkin sets with matte white plates for a quiet look. Budget runs $15 to $45 for good linen. The mistake is ironing everything to perfection. A slight rumple reads handmade and real. One detail to try is offsetting the plate 2 inches toward the front of each place setting to make the scene feel more lived in which helps with natural candid food snaps.
Ceramic Bowl Cluster For Hygge Soup Shots
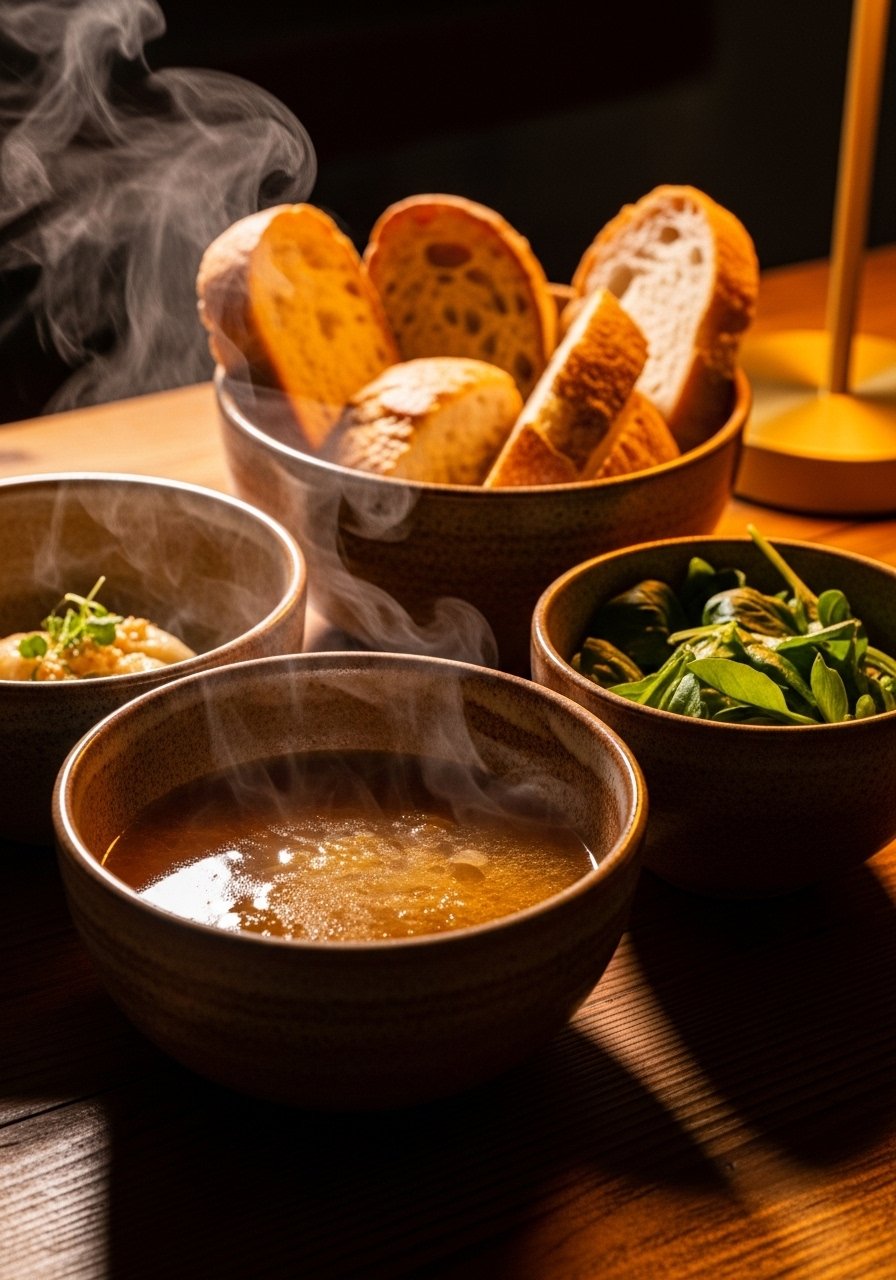
A cluster of ceramics gives depth and layers to soup and stew photos. Use three bowls in descending sizes so a 6 inch, a 5 inch, and a 4 inch piece create a pleasing triangle. I mix a handmade stoneware soup bowl with a thrifted bread plate and a small dip bowl. Expect to spend $20 to $80 depending on artisanship. People often center the bowl in the frame. Shift it off-center and include a bowl edge or spoon for motion. A small note nobody tells you is to wipe the rim but leave a tiny visible drip for authenticity. If you want steam, photograph quickly after ladling to catch the heat.
Foraged Greens And Simple Still Life
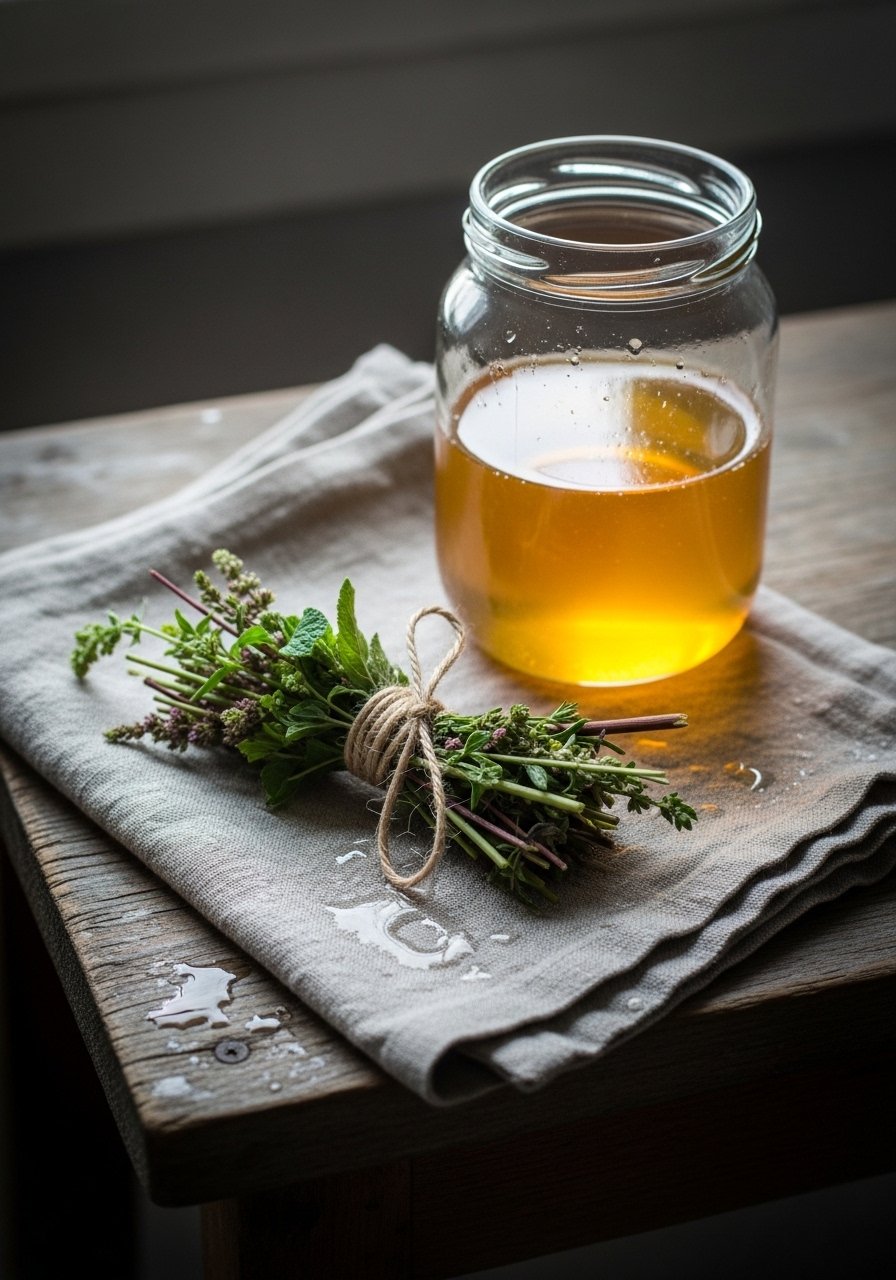
Foraged bits make Scandinavian food snaps feel seasonal. I tuck a sprig of spruce or a handful of wild greens into a bowl or onto a slice of bread for texture. Use a small kitchen twine roll to tie bundles and a cheap glass honey jar to add shine. Budget under $20 if you harvest from your yard. The common mistake is overdoing it with too many different greens. Stick to one dominant leaf and one accent herb. A specific tip: place the bundle at a 30 degree angle relative to the frame to guide the eye toward the main dish.
Layered Platters For Coffee Table Snaps
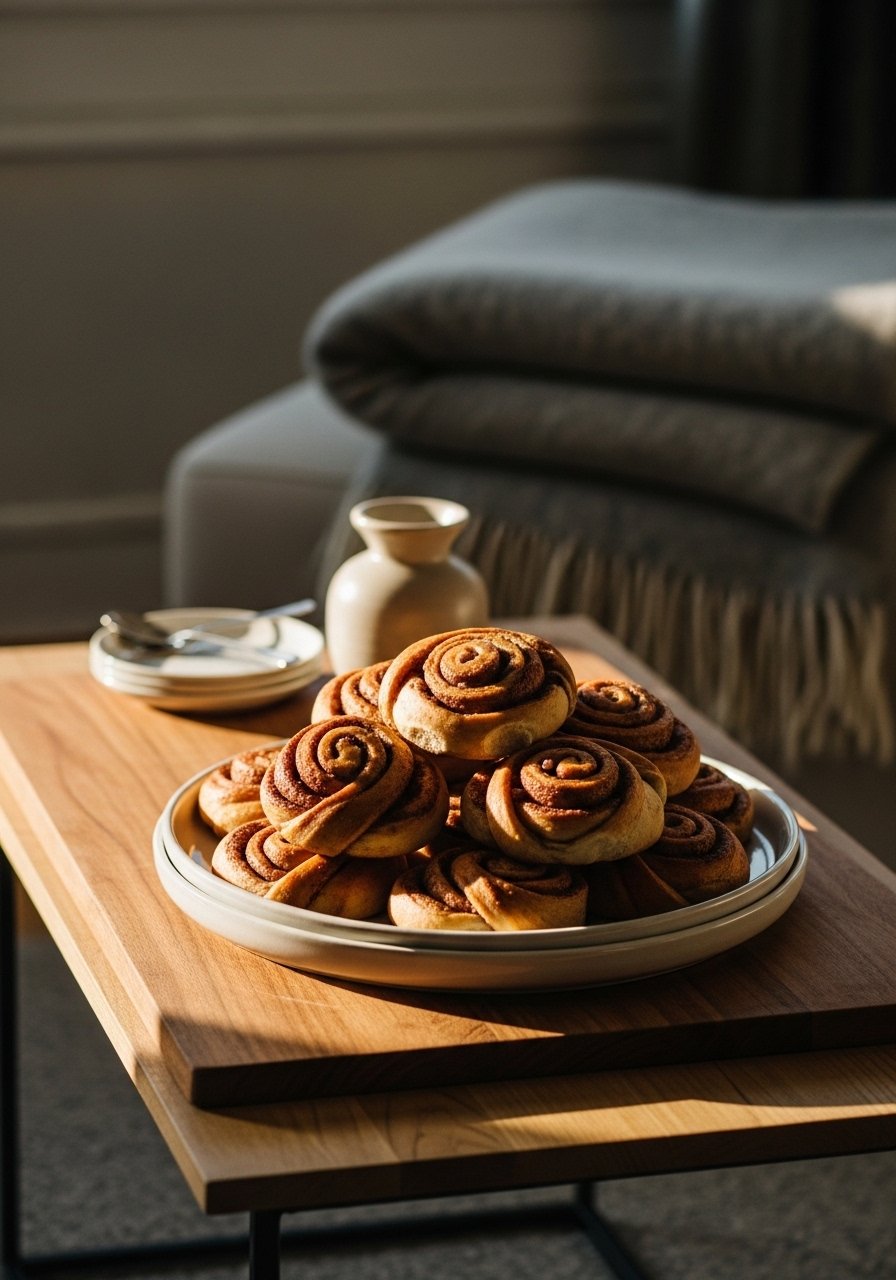
Layering platters on a coffee table makes snacks look intentional for weekend photos. Use two platters stacked slightly off-set, a 14-inch wood base with a 9-inch ceramic top. I use a round wood serving board topped with a ceramic dessert plate. Budget $25 to $70. A typical mistake is arranging everything symmetrically which looks staged. Try asymmetry and leave one platter empty or add a small bowl of nuts. One small detail I learned is to place a cloth napkin under the edge of the top plate so shadows fall naturally between layers.
Candlelit Smørrebrød Night For Dining Room
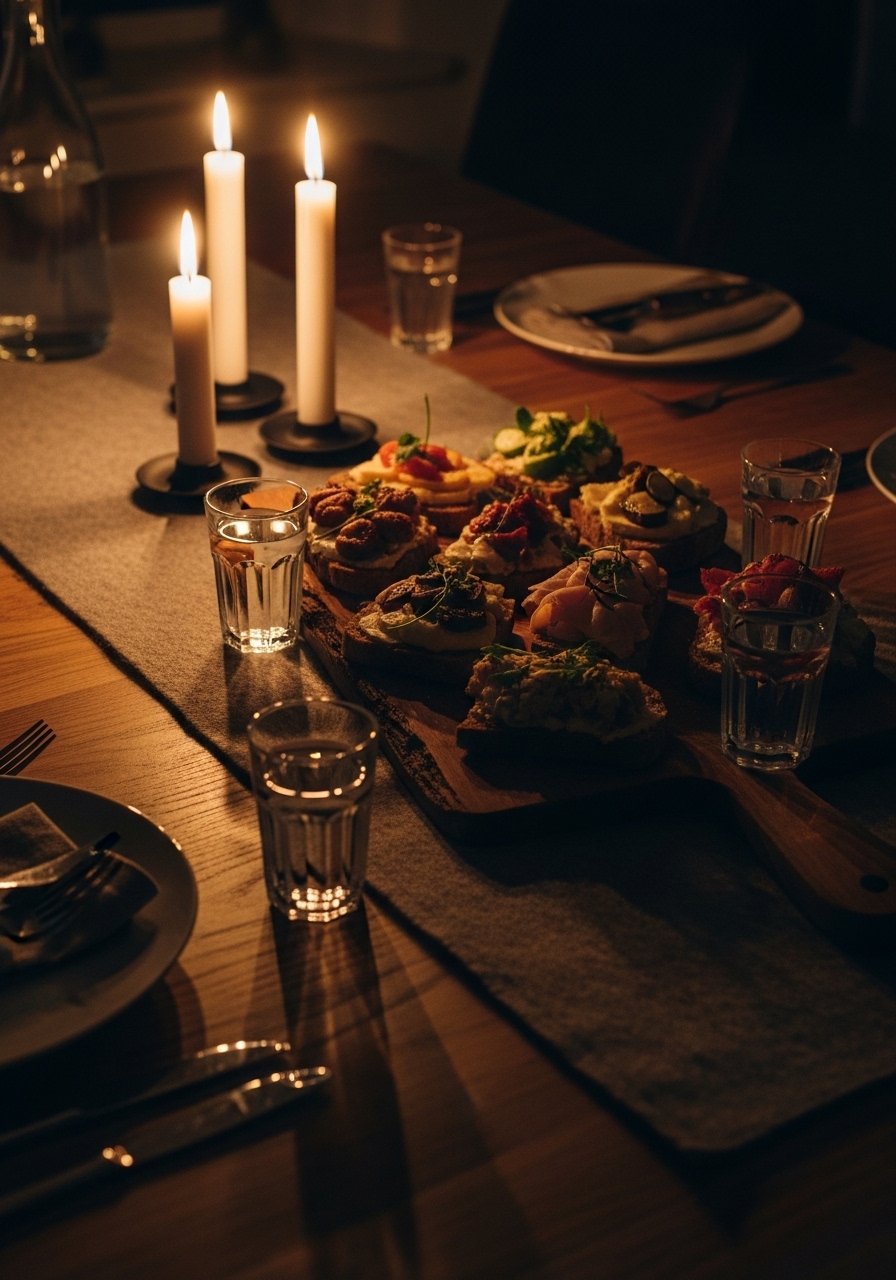
Candles make night photos soft and Scandinavian. Use two or three tapered candles, staggered heights by 1 to 3 inches, to avoid flat lighting. I keep a set of unscented taper candles and a pair of small candle holders for safety. Budget $10 to $30. The mistake is using scented candles while food is in frame because scents can skew how guests feel about the dish. A trick no one mentions is to film a quick video clip during candle-lit photos to capture flicker, then pull still frames for a more natural look.
Window-Lit Jam Jar And Toast Close-Up
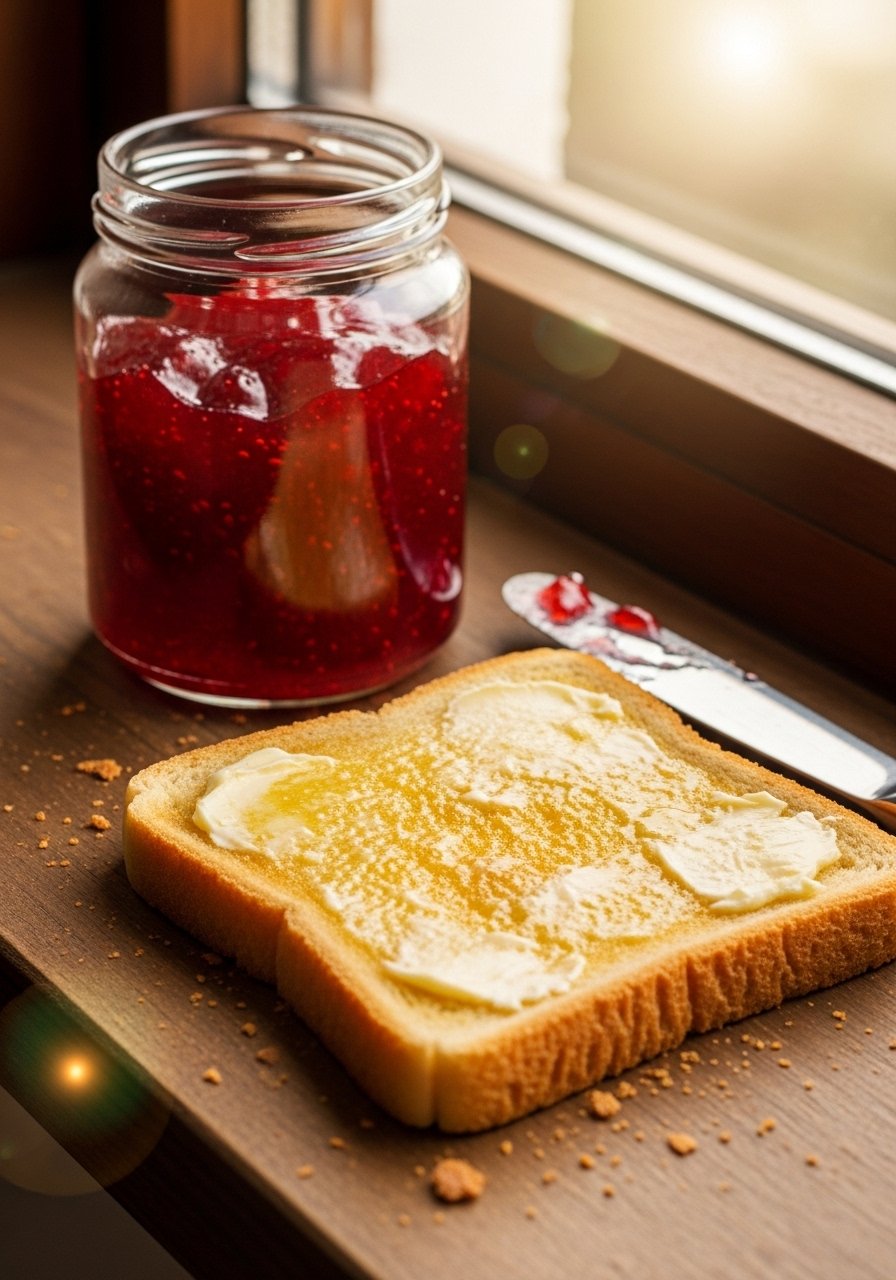
I learned that window sills are the best impromptu photo tables. Place a small jam jar and one piece of toast on the sill, shoot at a 30 degree angle into the light, and use a shallow depth of field. A small glass jam jar set and a butter spreader knife are the only props you need. Budget is under $25. People often put the jar directly in the center of the frame. Move it slightly back and left to add depth. One pro detail is to warm the toast slightly under a low broiler for 10 seconds for that golden speckle that photographs so well.
Contrast With Dark Boards For Bright Food
Bright Scandinavian foods pop on dark boards. Use a black or walnut board to make yellows and reds sing. My favorite is a walnut charcuterie board paired with white ceramic dipping bowls. Budget $30 to $90. The mistake is adding a dark plate on top of a dark board which loses contrast. Instead, put smaller white dishes on the dark wood. A specific ratio that works is 60 percent board to 40 percent food coverage for balanced negative space. Try shooting from slightly above eye level to keep edges crisp.
Messy Hands Baking Rye In Kitchen Corner
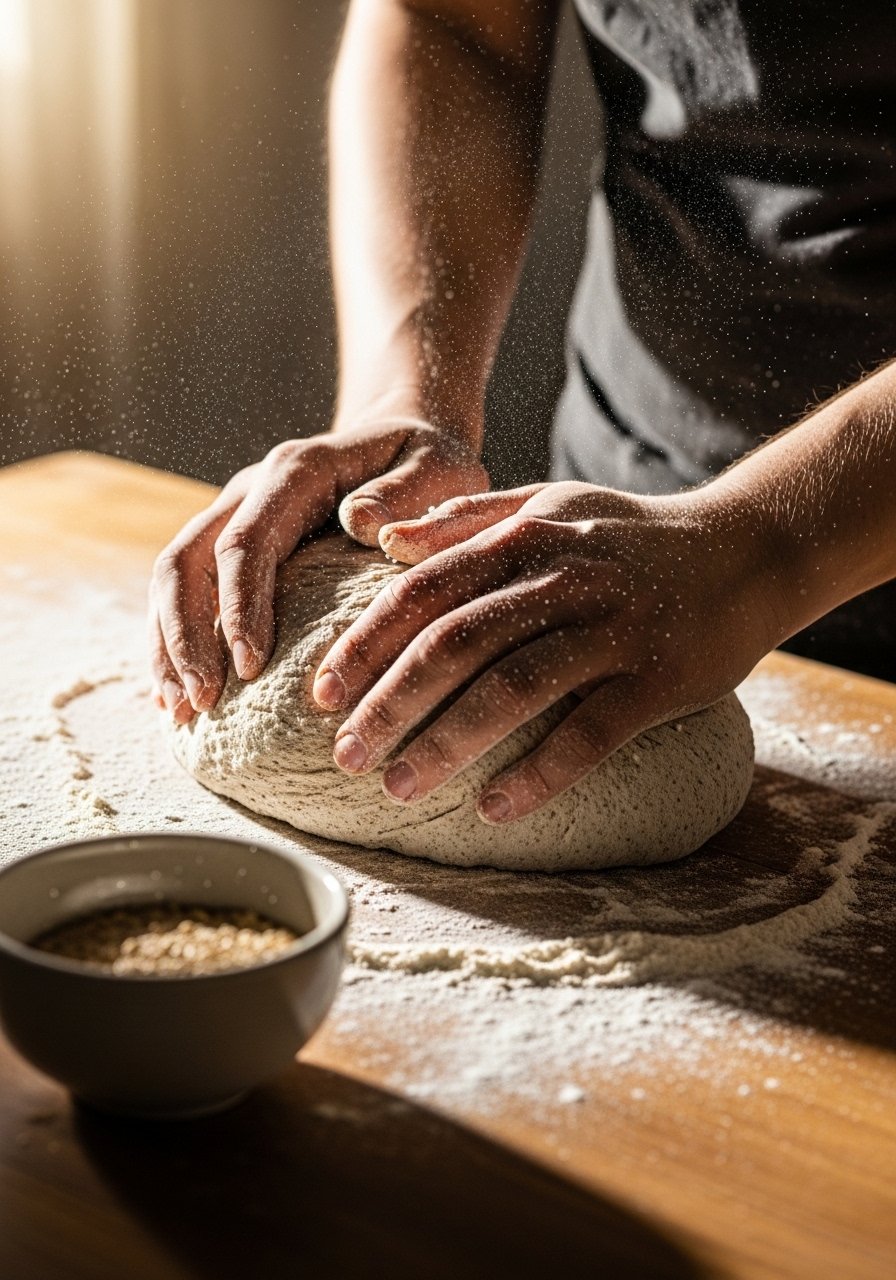
Action shots tell a story. I started photographing my hands kneading dough and the whole feed felt more human. Capture motion with a slightly faster shutter but not too fast so you still see flour dust. A cheap dough scraper and a linen apron will help. Budget $15 to $40. The mistake is over-planning the scene. Let hands be imperfect and leave a bit of raw dough on the counter. A small technical tip is to keep the horizon level in these shots to avoid an awkward tilt that distracts from the action.
Seasonal Berry Bowl On White Oak Side Table
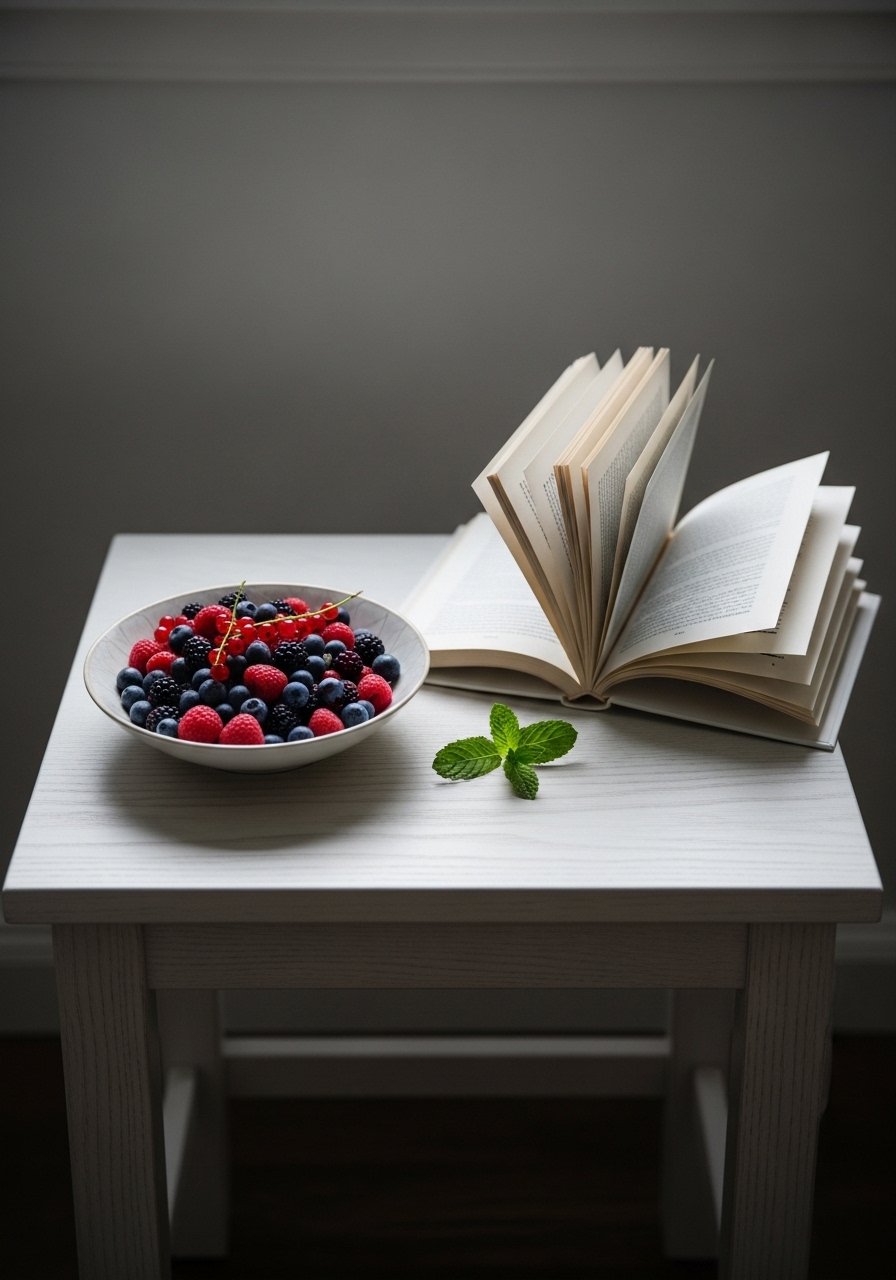
A single bowl of berries feels like a Scandinavian postcard. Use a shallow 8 to 10 inch bowl so the berries don’t look piled. I use a porcelain serving bowl on a white oak side table and add a tiny mint leaf for contrast. Budget $20 to $50. People often go too large with bowls which flattens the image. Keep the bowl size proportional to the table. One little trick is to sprinkle a few berries on the table near the bowl to create a sense of casual abundance.
Your Decor Shopping List
Round wood serving board in 14-inch, perfect for coffee table layers
Honestly the best $30 I have spent. Linen napkins set of 4 in beige, 22-inch, just rumple them and call it intentional
Stoneware soup bowl 6-inch, matte finish, great for stew close-ups
Walnut charcuterie board 18 by 12 inch, use for high contrast shots, splurge option
Mini glass jam jars set for preserves and little props, cheap and flexible, similar at local farmers markets
Unscented taper candles and minimalist candle holders for warm evening snaps
Acacia cutting board large for flat lays and sandwich shots
Glass honey jar with lid for shine and tiny reflections
Shopping Tips
Match scale to your table. Buy a 12 by 16 inch tray for small coffee tables. Too big looks empty, too small looks cluttered.
Grab linen napkins for texture. Swap colors seasonally and the whole room feels different.
If you want one splurge, pick a good walnut charcuterie board. White oak is trendy but walnut makes colors pop.
Buy a set of mini jam jars for portioning and styling. They double as storage so you do not waste them.
One tall faux or real plant in the corner is more effective than five little succulents. Try a 6-foot artificial fiddle leaf fig for impact.
Frequently Asked Questions
Q: What camera or phone settings should I use for these food snaps?
A: Use natural window light and lower ISO to avoid grain. On a phone, tap to lock exposure and nudge the slider down for richer tones. For action shots like kneading, raise shutter speed a bit. No fancy gear required, just steady hands.
Q: Can I mix modern ceramics with vintage wooden boards without it looking mismatched?
A: Yes. The secret is limiting contrast to one element at a time. Pair a modern matte bowl with a single vintage board and keep linens neutral. That keeps the scene intentional rather than chaotic.
Q: How do I get warm tones without changing food color?
A: Use warm reflectors like a light wood board or a folded beige linen to bounce warmth back into food. A thin slice of lemon or a wooden butter knife can add a bit of warm highlight without altering the food itself.
Q: Should I buy props online or hunt secondhand?
A: Both. Secondhand gives unique texture and personality. I buy basics like napkins and jars online and hunt for boards and ceramics at thrift stores. Switching brands for the same color often cuts your bill by a quarter.
Q: Any tips for photographing in small apartments or low light?
A: Make the windows your studio. Move the plate close to the light source and shoot into the light. Most people mess up their first match ignoring the room's lights. Also use a reflector like a white plate across from the window to fill shadows.
Q: How do I make photos feel real and not overly styled?
A: Leave a small mess. A butter smear, a couple of crumbs, or a tiny water droplet looks lived in. A ton of folks end up repainting because the match wasn't spot-on. That idea applies to staging too, because trying to force perfection often ruins the natural look of a scene.

