

My living room had nice furniture and decent lighting but it still felt like a waiting room. Took me embarrassingly long to figure out it was missing texture. Once I added a wood plank wall behind the sofa the space finally invited people to sit down and stay. Here are my favorite peel and stick and lightweight wood ideas that look real without a contractor.
These ideas lean modern rustic with a few minimalist and boho options sprinkled in. Budgets run from under $30 for a trial peel and stick roll to around $150 for solid floating shelves and decorative panels. Most of these work in living rooms, bedrooms, entryways, or a tight rental nook that needs personality.
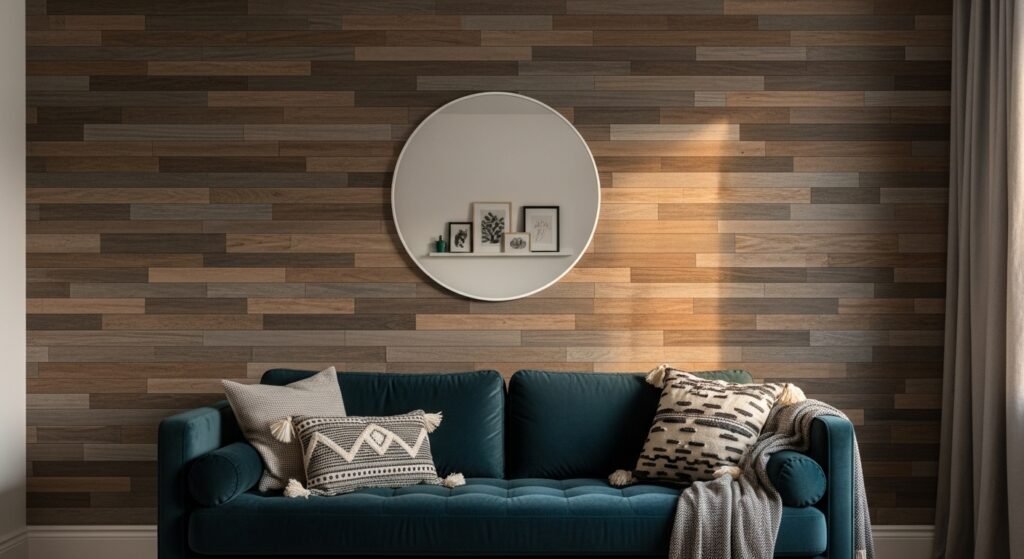
Rustic Entryway Shiplap Accent Wall for Small Halls
I started here because your entry gives the first impression. Horizontal shiplap in a soft whitewash reads like custom carpentry, but it is really diy easy peel and stick wood wall decor, which made installation doable in one afternoon. Budget is $40 to $90 depending on how much you cover. I used 4.5-inch wide planks and spaced seams staggered by one third for a natural look. Common mistake, especially in rentals, is placing the top row flush to the ceiling. Leave a 1/4-inch gap and use caulk or paint to finish for a cleaner edge. Try these peel and stick shiplap planks for a realistic grain and matte finish peel and stick shiplap planks.
Modern Minimal Peel and Stick Plank Wall for Living Room
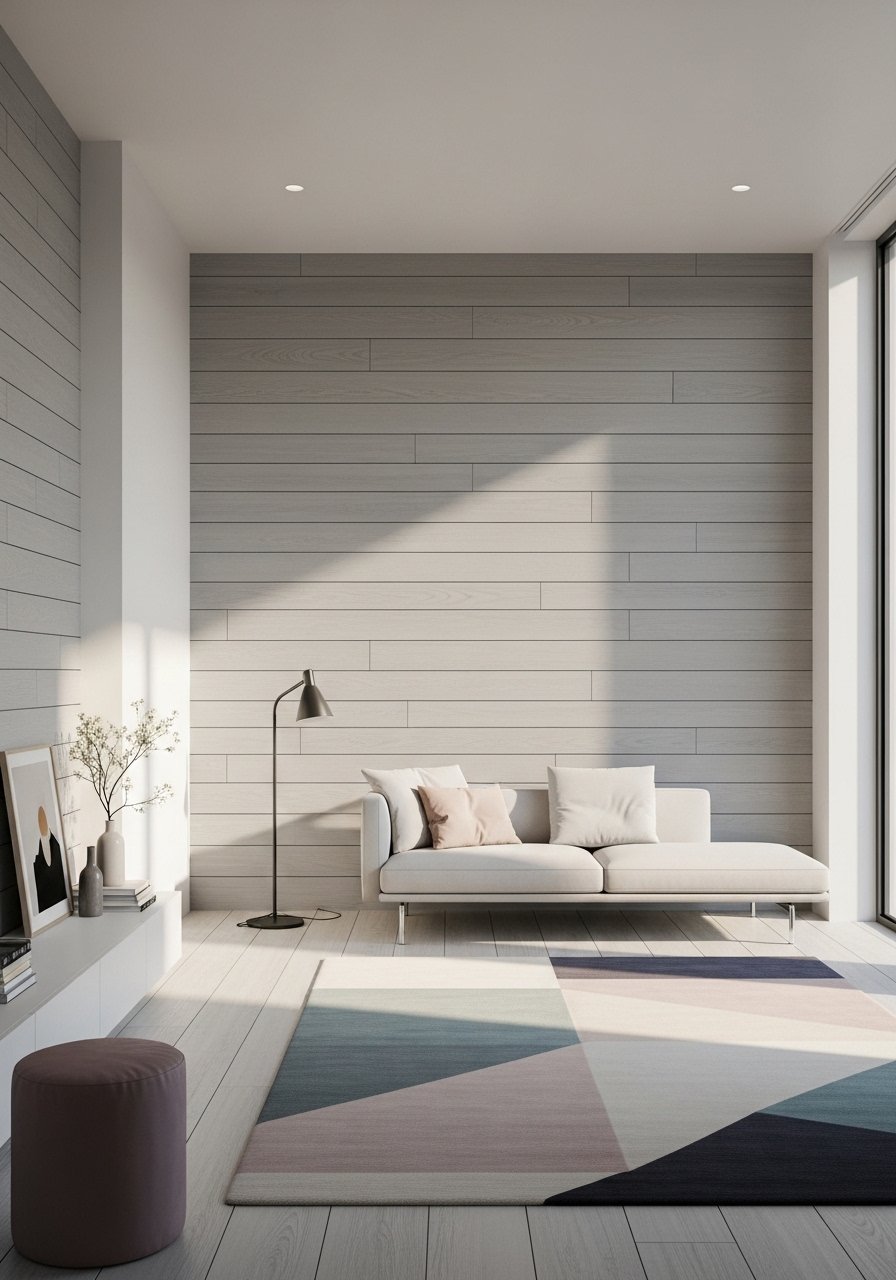
If your furniture is modern, go for long, narrow planks in a cool gray to keep the room feeling sharp. I used 6-inch by 48-inch planks to create a long-grain look that makes the wall read wider. This idea costs about $60 to $120 depending on coverage. A mistake I see is choosing planks with a glossy finish. Pick a low-sheen option so it photographs like real wood. Pair this with a slim floating media shelf for balance, like white oak floating shelf that sits at one third of the wall height for pleasing proportions.
Textured Chevron Accent in Bedroom
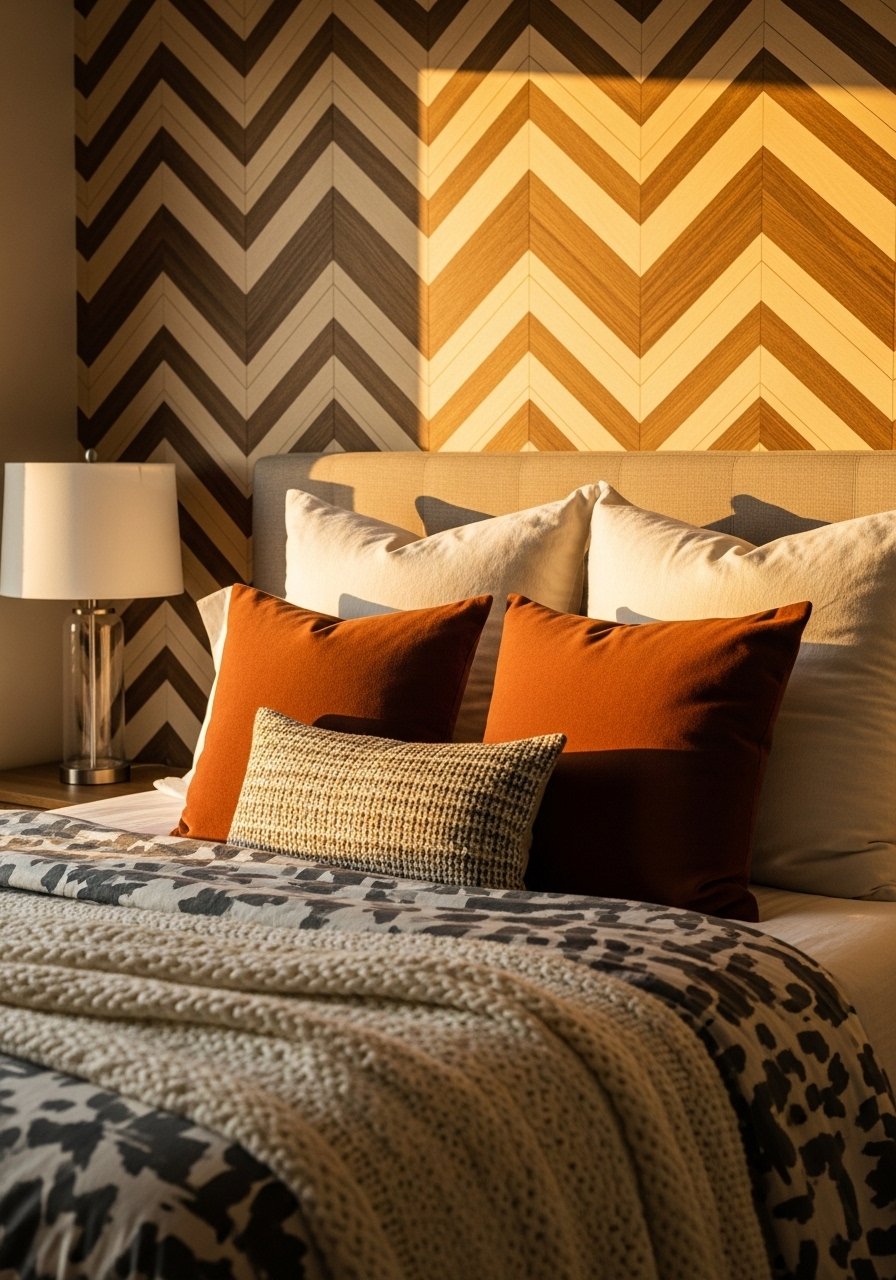
A chevron pattern instantly reads handcrafted. I cut 1.5-inch strips from peel and stick planks and assembled them on a 4×6 sheet of thin plywood first, then stuck that sheet to the wall. It saved time and kept seams flush. Budget runs $50 to $120 for 4×6 coverage. Common mistake, which I made once, is not planning the central seam. Start the chevron off-center by 3 inches for a less matchy look. Use a miter box and a compact utility saw for clean cuts.
Weathered Barn Wood Look Behind TV
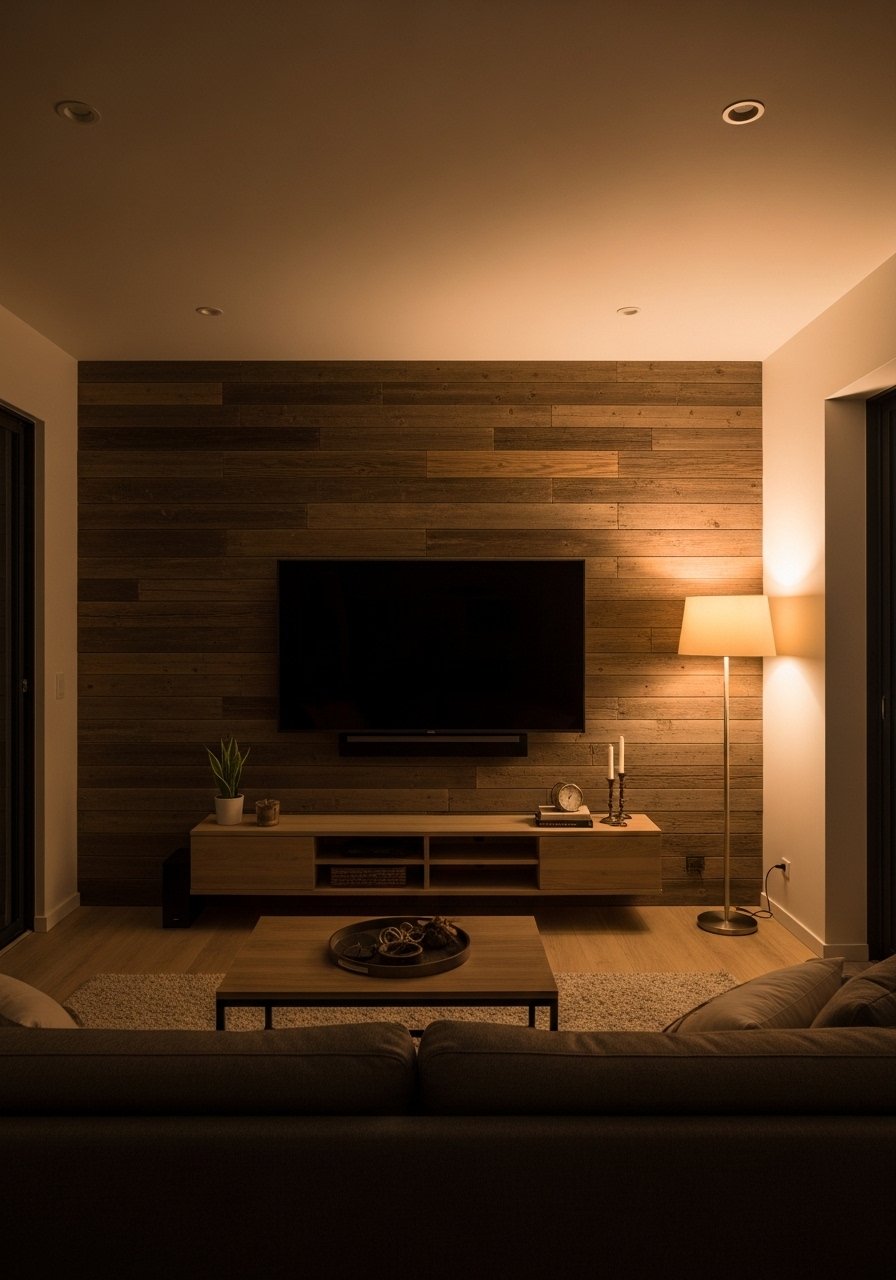
TV walls need to feel intentional because they are heavy visually. I used darker peel and stick planks with visible knots to mimic barn wood. Keep your TV mounted so the planks frame it rather than compete. Budget about $80 to $150. A mistake is covering the whole wall when a 60 to 70 percent field behind the TV is enough. Measure the TV plus 6 inches on each side and use that as your guide. I finished mine with a thin floating console like this warm wood media shelf.
Floating Shelf Backdrop for Home Office
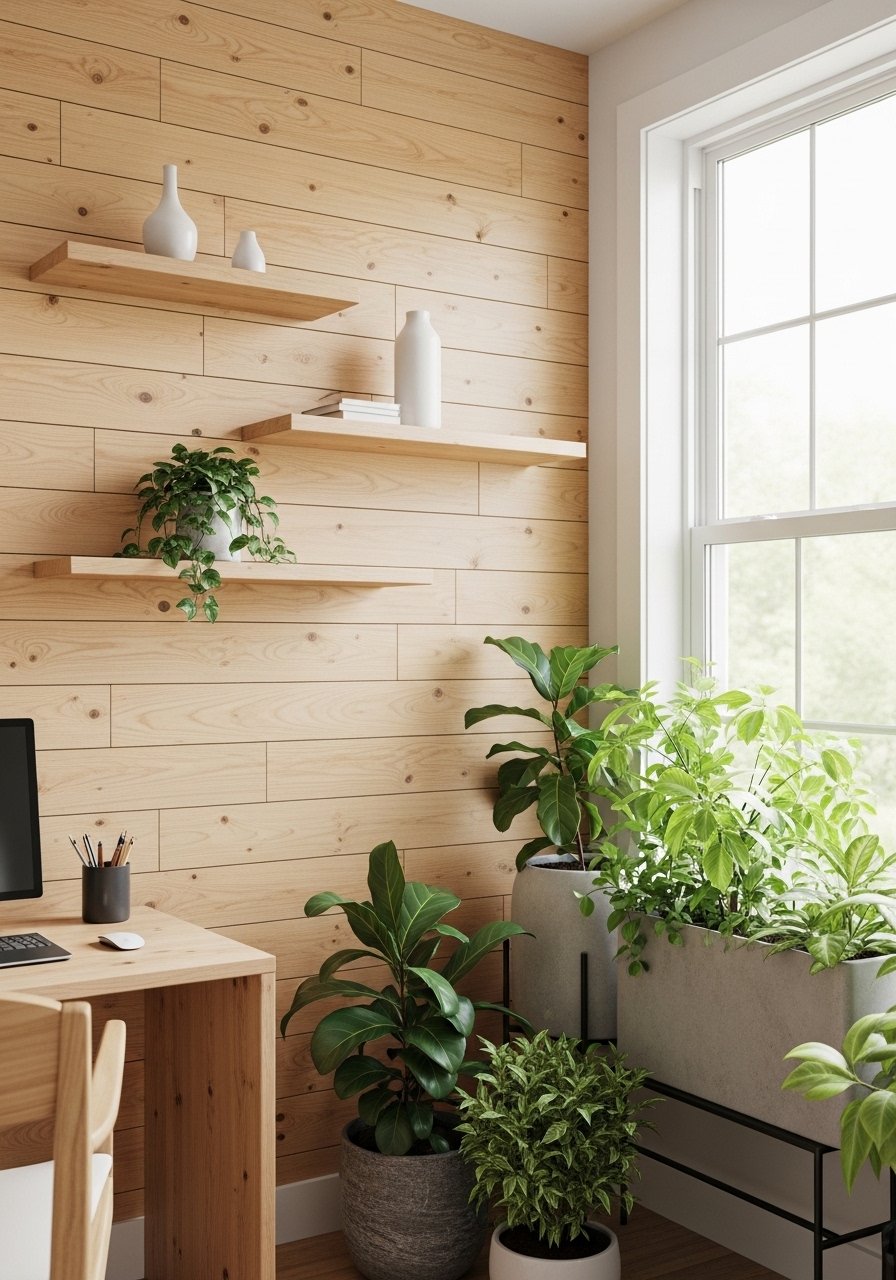
A wood backdrop makes work-from-home spaces feel deliberate. I installed vertical peel and stick slats behind two floating shelves and used the rule of three for styling. This costs about $70 to $120 including shelves. Newbies often clutter the shelves. Keep one shelf for books and one for objects so it reads tidy. Specific detail most articles skip, measure shelf depth against your monitor. I used 10-inch deep shelves so a lamp and a stack of books still fit, like these floating shelves 10-inch deep.
Mixed Width Plank Paneling for Dining Room

Mixing 2.5-inch, 4.5-inch, and 6-inch planks avoids the cookie-cutter look that many peel and stick walls fall into. I followed an 80/20 color ratio, where 80 percent was a warm oak and 20 percent a darker tone for contrast. Expect $90 to $180 for a full wall. A common error is repeating the same width pattern across the wall. Randomize lengths and stagger joints by at least 12 inches. If you want the look of nailed boards, add thin shadow lines using a fine-tip wood stain marker. Find multi-width plank packs like these mixed-width wood planks.
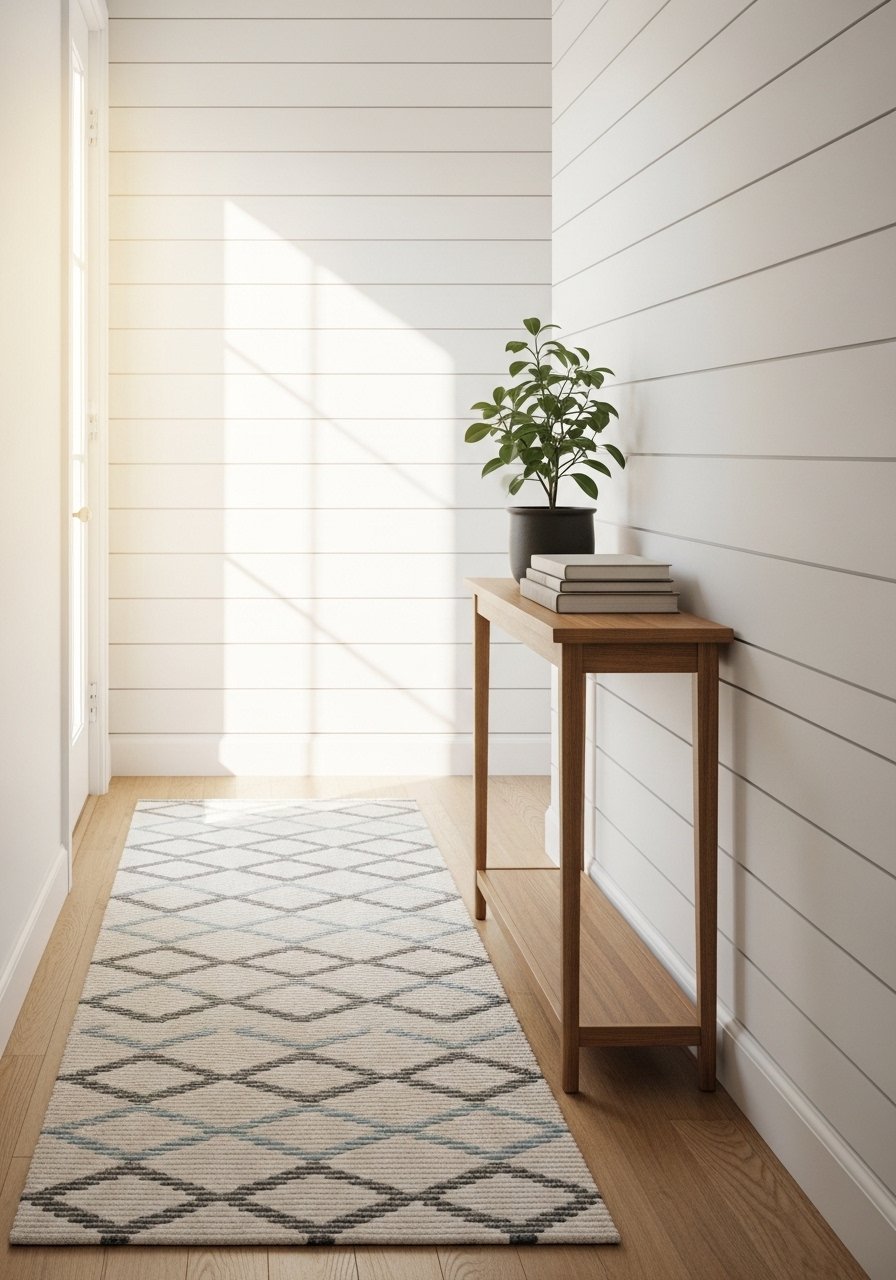
Vertical Slat Accent in Hallway
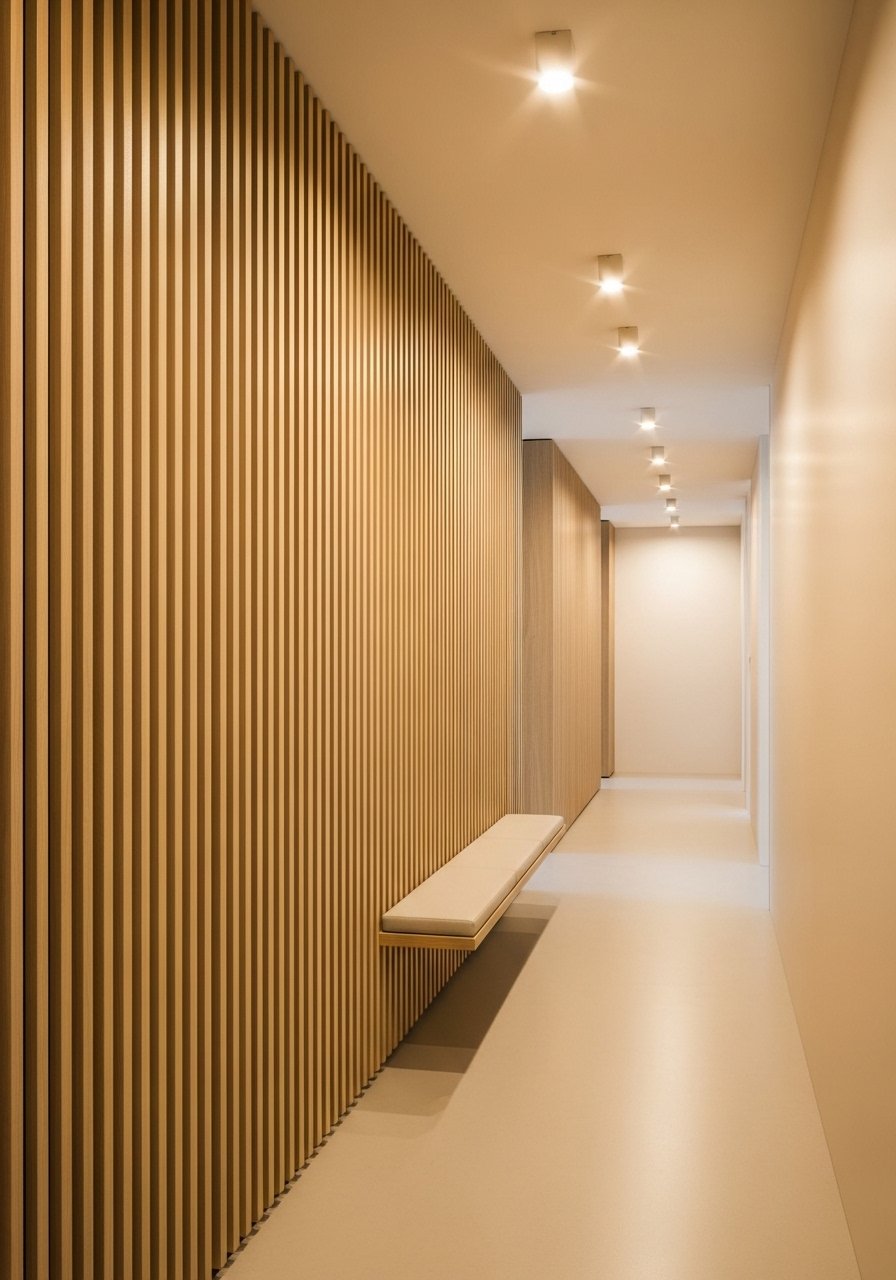
Vertical slats make low ceilings feel taller. I used 1-inch strips placed 1.5 inches apart for a rhythm that reads expensive. Budget is $40 to $100 for a short hallway. The mistake people make is using slats that are too wide which shortens the wall. A small detail that helps is wrapping the slats around the corner by one strip for a built-in feel. Pair with a slim bench and a narrow hallway bench for function.
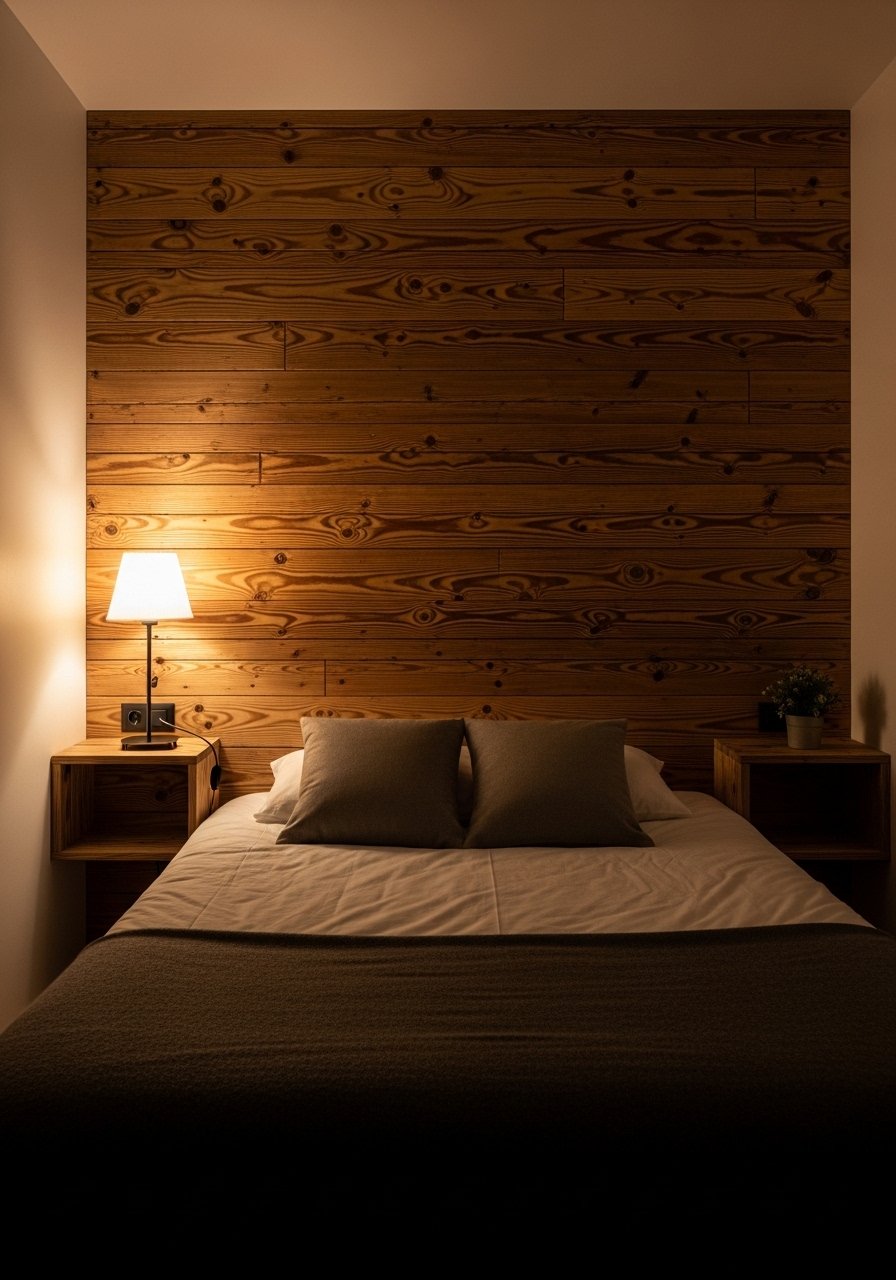
Reclaimed Wood Look Above Bed Headboard
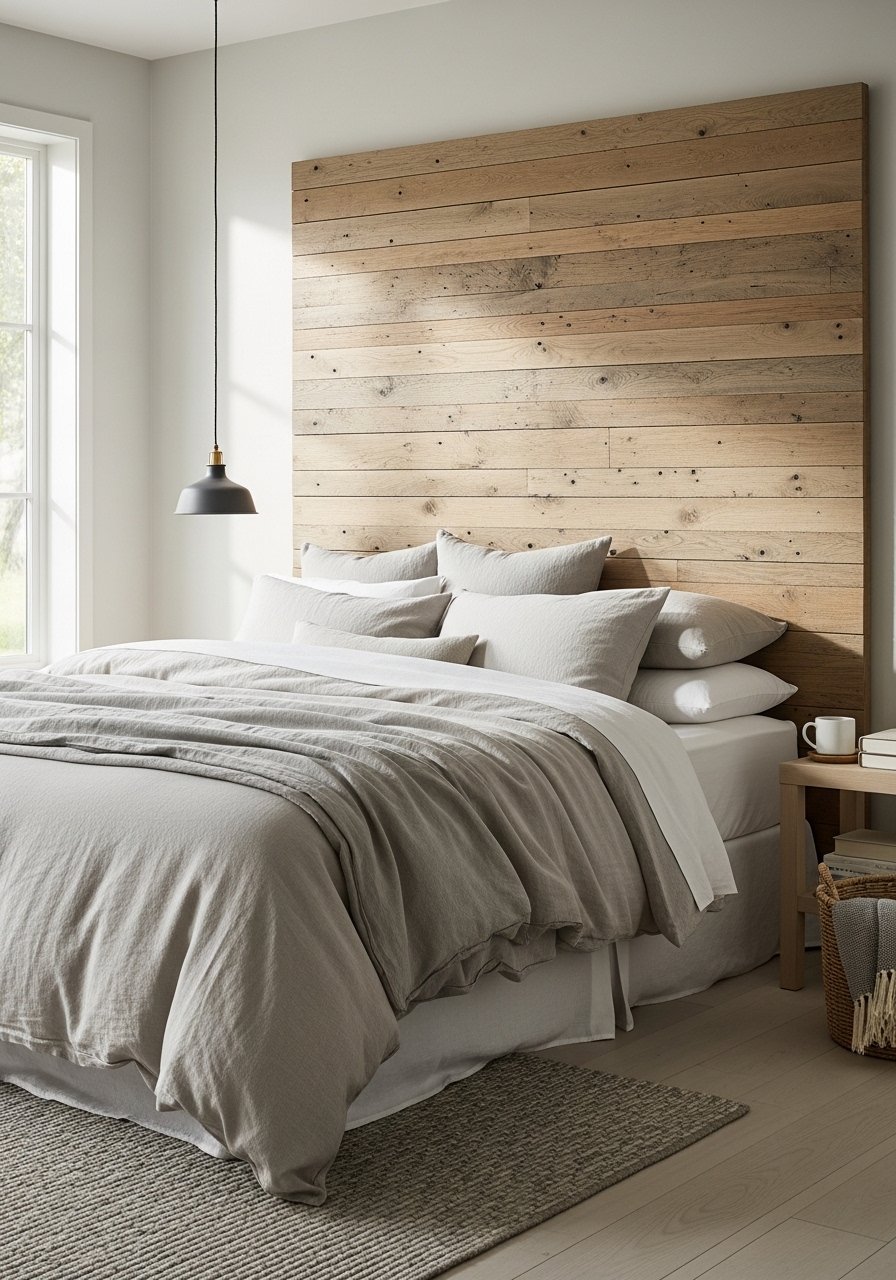
A single reclaimed-looking panel behind the bed reads like a headboard and saves floor space. I used a 48-inch high by full bed-width panel. It cost me about $70 to build with peel and stick and thin plywood backing. People often mount too low. The top of the panel should sit 6 to 8 inches above the tallest pillow for balanced scale. For a realistic aged finish, dry-brush white paint lightly across grain lines. For mounting, I used heavy-duty adhesive strips paired with small screws into studs and a sturdy picture hanging kit.
Peel and Stick Geometric Wall Art for Accent Wall
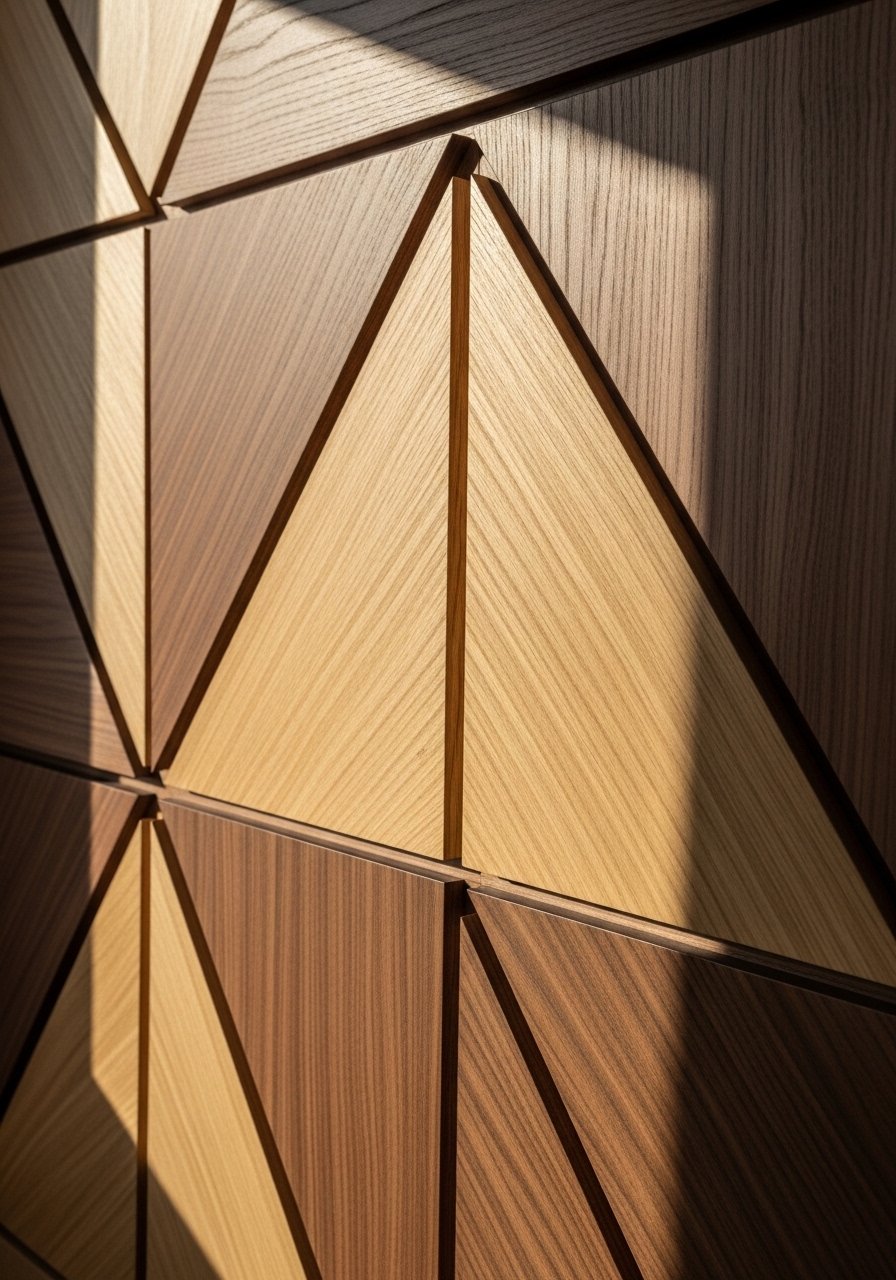
Instead of covering an entire wall, create a geometric mural with triangular wood pieces. I traced a 4×4 foot grid on the wall and used peel and stick planks cut into triangles. It cost about $30 to try a 4×4 version. The mistake is not planning the grout lines. Keep triangle seams consistent at 1/8 inch to avoid a sloppy look. This is perfect above a console or in a nursery. Use a precision cutting tool for crisp angles.
Faux Beam Mantel Shelf for Fireplace

A chunky faux beam reads like structural wood but is lightweight. I installed a 6-inch by 8-foot faux beam above the fireplace to anchor art and plants. Cost around $90 to $160. Don’t make the beam too narrow or it looks like trim. Aim for a depth at least as deep as your mantel decor, usually 6 to 8 inches. Use a mix of faux and real elements by adding a real eucalyptus garland. Try this faux wood beam mantel shelf.
Midcentury Modern Sunburst Paneling in Entry
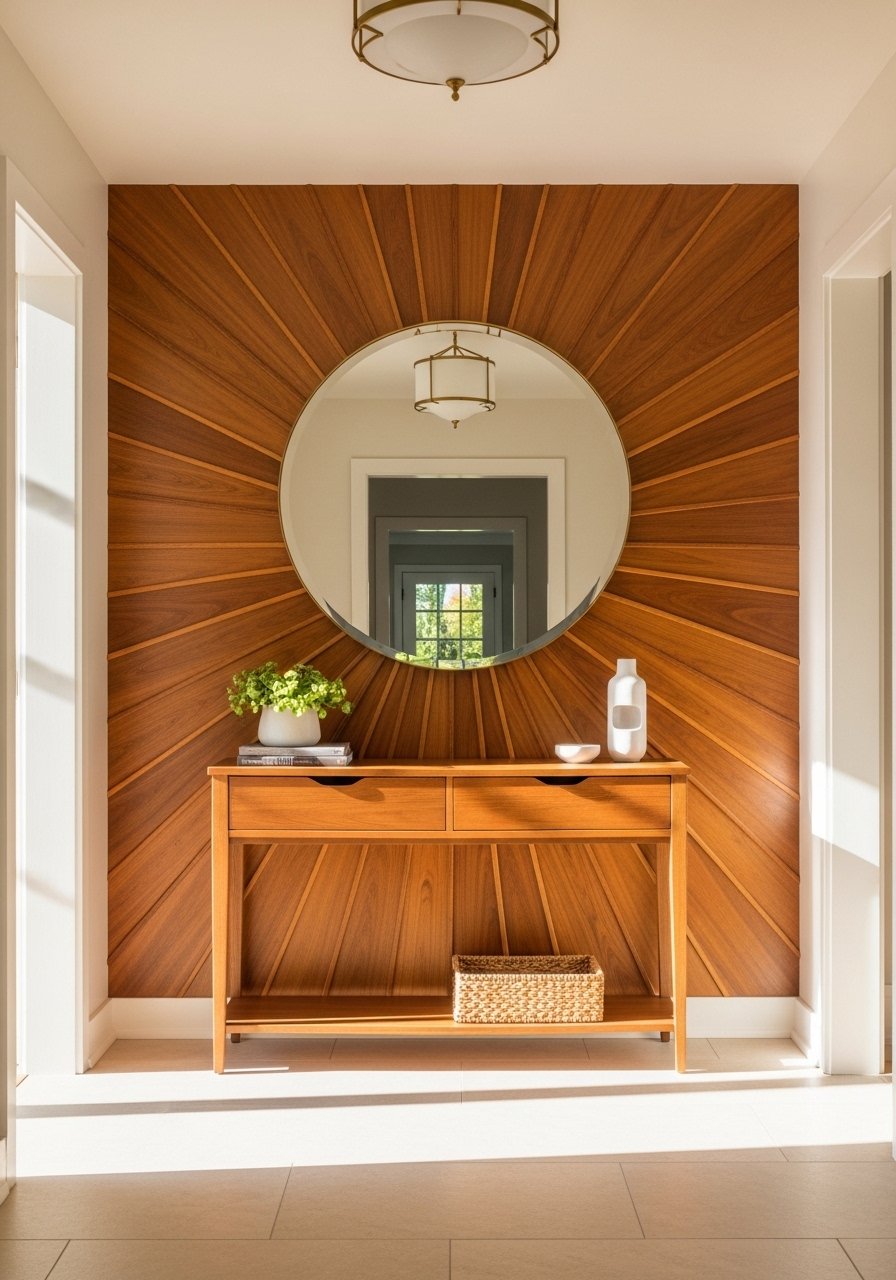
Sunburst paneling gives instant retro flair. I cut thin strips and radiated them from an off-center point that aligns with the ceiling fixture. Budget under $100 for a 3-foot diameter installation. Mistake people make is centering the burst to the wall. Off-center creates motion and looks more intentional. Use alternating light and medium tones and keep the outer ring about 10 percent darker for depth. A useful tool is these wood angle templates.
DIY Wood Plank Headboard Wall for Small Bedroom
For a small bedroom, a headboard wall can replace furniture and save space. I installed planks only across the lower 40 percent of the wall and painted the upper wall a complementary color. Budget $50 to $90. People often pick planks that are too glossy. Low-sheen planks read more like real wood and photograph better. Try a layered look with two 22-inch linen pillows in front of the planks for texture. These peel and stick wood planks in matte finish work well.
Two-Tone Wainscoting Look for Powder Room

Wainscoting in wood tones modernizes small bathrooms without full tile. I used peel and stick panels on the lower third and painted the upper two-thirds a contrasting muted blue. Budget roughly $40 to $80. A common mistake is not sealing edges near water. Use a bead of waterproof caulk where panels meet countertops. For scale, keep the panel height between 30 and 36 inches in standard powder rooms. I paired it with a slim round bathroom mirror.
Herringbone Pantry Door Makeover
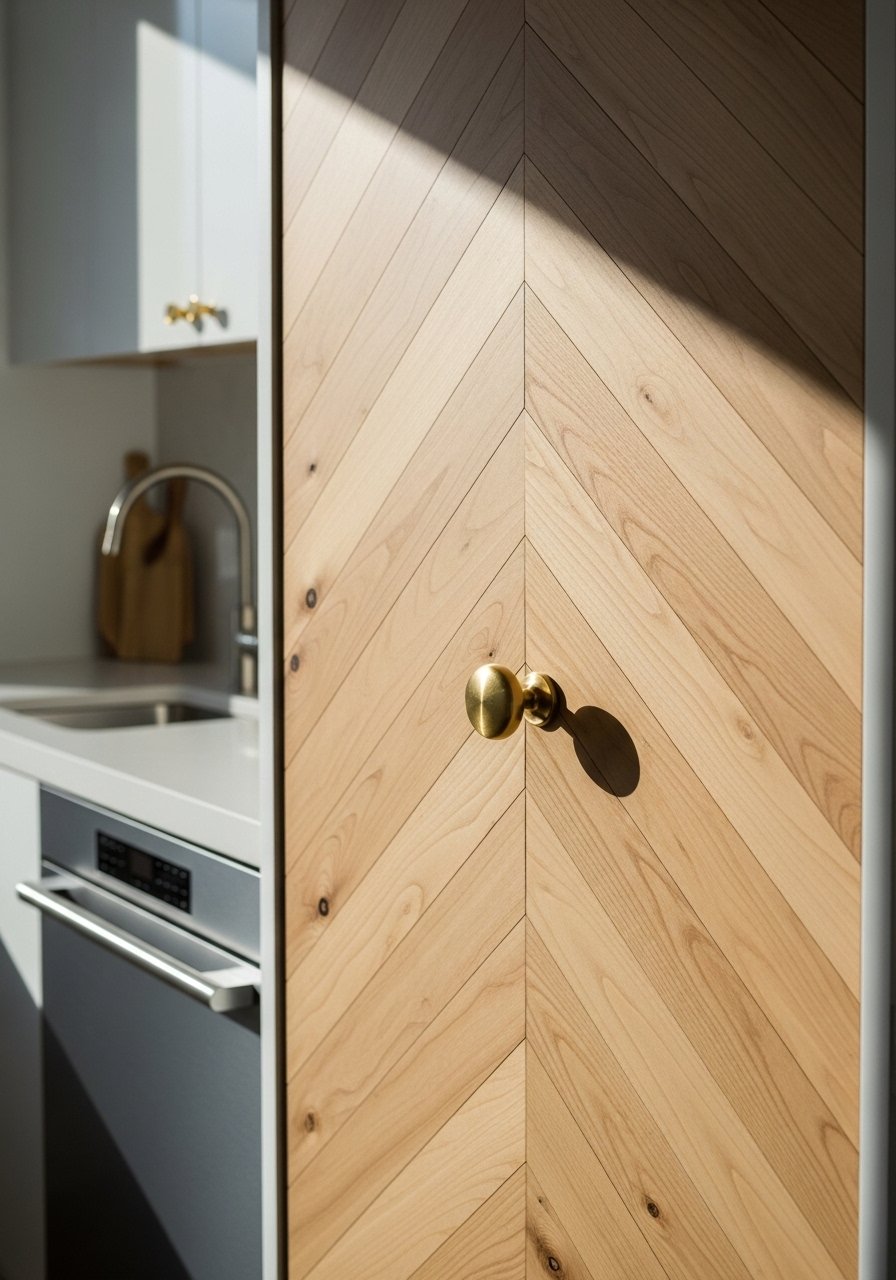
If you have one troublemaking door in the kitchen, cover it in a herringbone pattern to make it an intentional focal point. I cut 2×6-inch planks and arranged them diagonally across the door. This costs about $25 to $60. Mistake to avoid, do not glue directly to hollow-core doors without a thin plywood backing. Attach strips to a 1/8-inch plywood sheet and then fasten that to the door. For hardware contrast, use a brass door knob.
Oversized Wood Panel Clock Backdrop
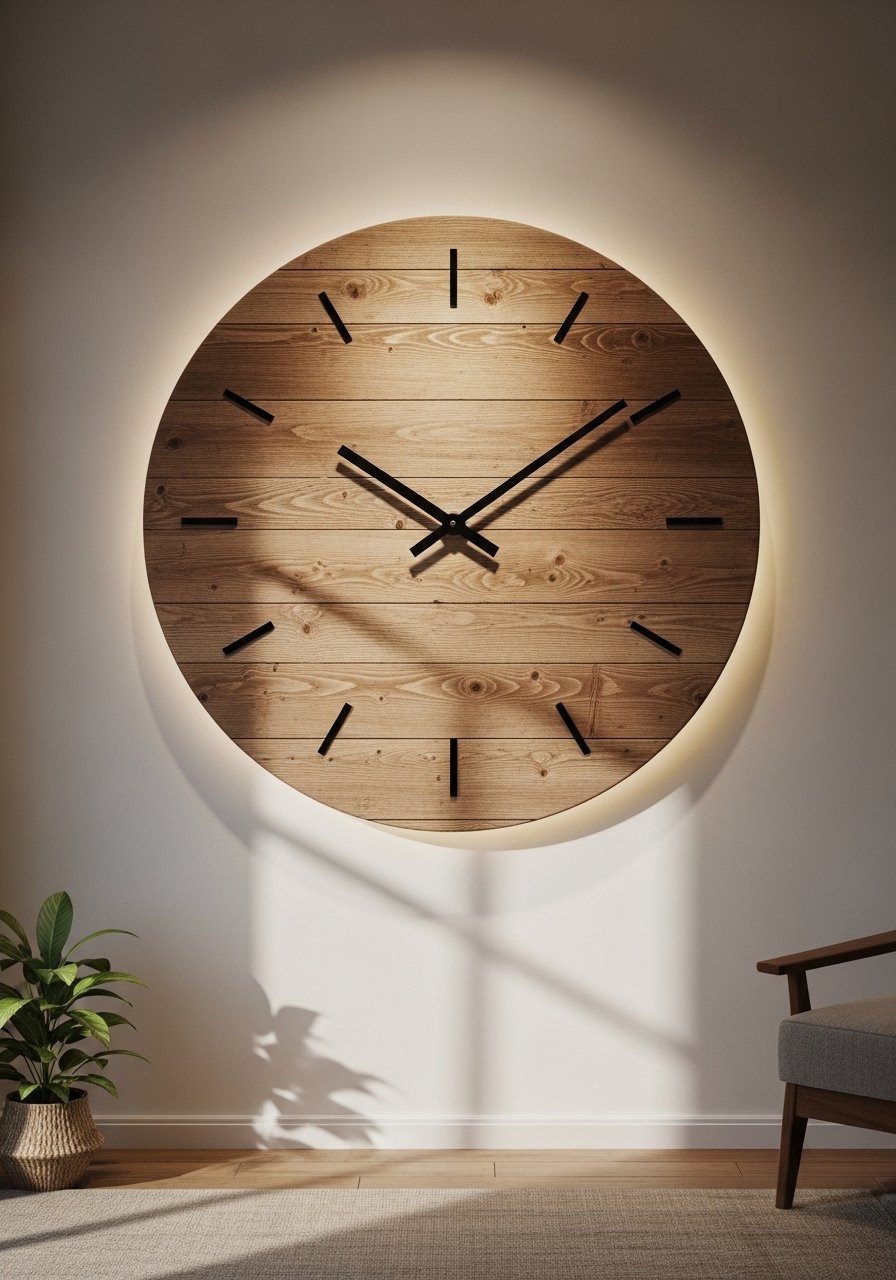
A single large panel provides drama without covering the whole room. I mounted a 48-inch round wood panel and hung a simple clock at center. It cost about $90 to make with peel and stick planks glued to a round MDF backing. People often pick busy clock hands that clash. Keep the clock simple or omit it and hang a mirror instead. For scale, the panel should be two-thirds the width of the sofa below it. Consider this large round wooden panel.
Gallery Ledge Wall with Warm Wood Grain
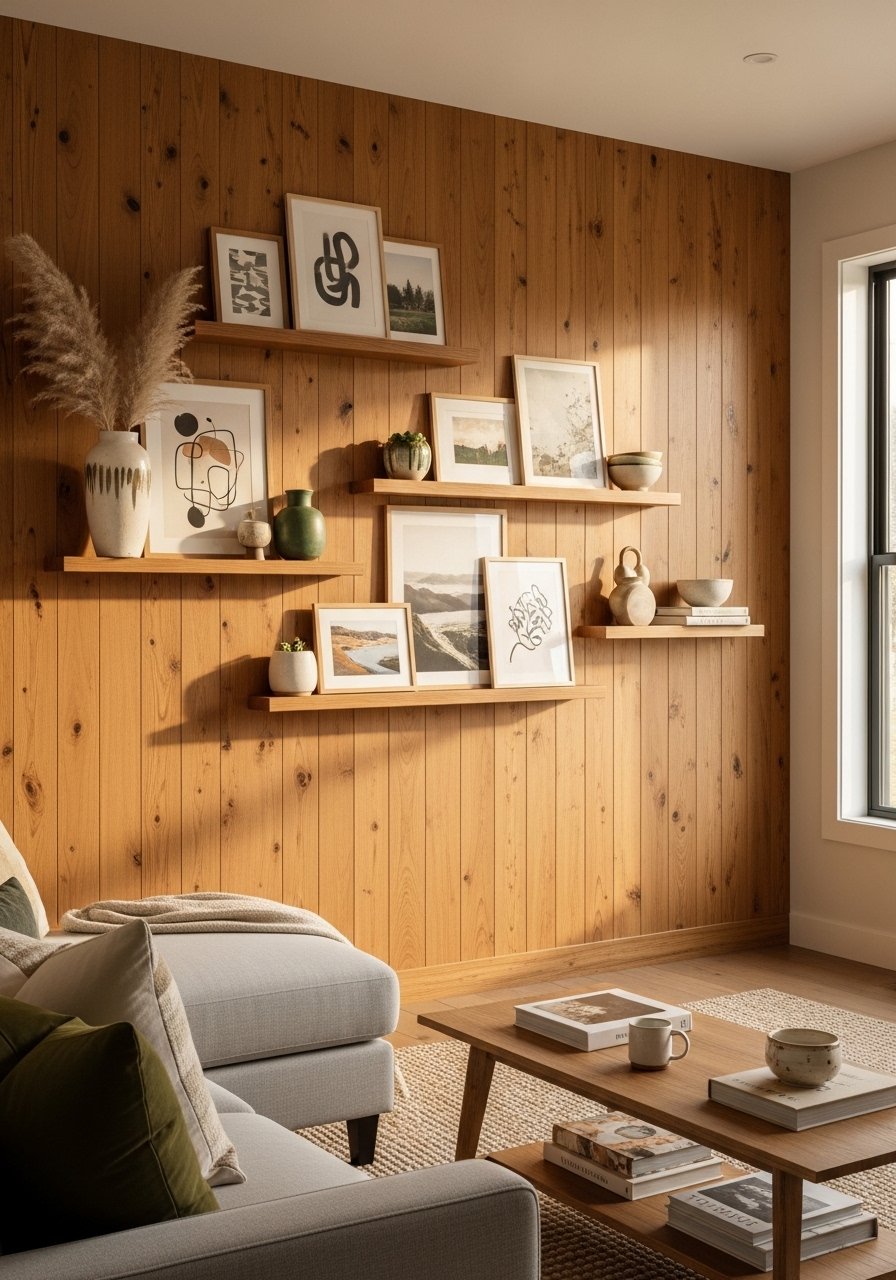
Gallery ledges let you swap art without new holes, which is great for renters. I installed a 6-foot run of ledges at eye level and leaned frames in groups of three for balance. Budget for the ledges is $30 to $70. A mistake is hanging frames at the same height across the entire run. Vary heights by 4 to 8 inches to create movement. I used brass and black frames together for contrast. Try these brass picture ledges.
Peel and Stick Wood Tile Bathroom Accent
Wood-look peel and stick tiles are water resistant and work behind a vanity or in a dry shower niche. I used 3×12-inch tiles in a vertical stack behind the sink to warm a mostly white bathroom. Expect $30 to $80 depending on coverage. Mistake, do not place these where they will get direct spray unless they are rated for moisture. For grout-like separation, leave a 1/16-inch gap and use silicone filler. These wood-look peel and stick tiles are an inexpensive trial before committing to real tile.
Staircase Runner Wall with Vertical Wood Slats
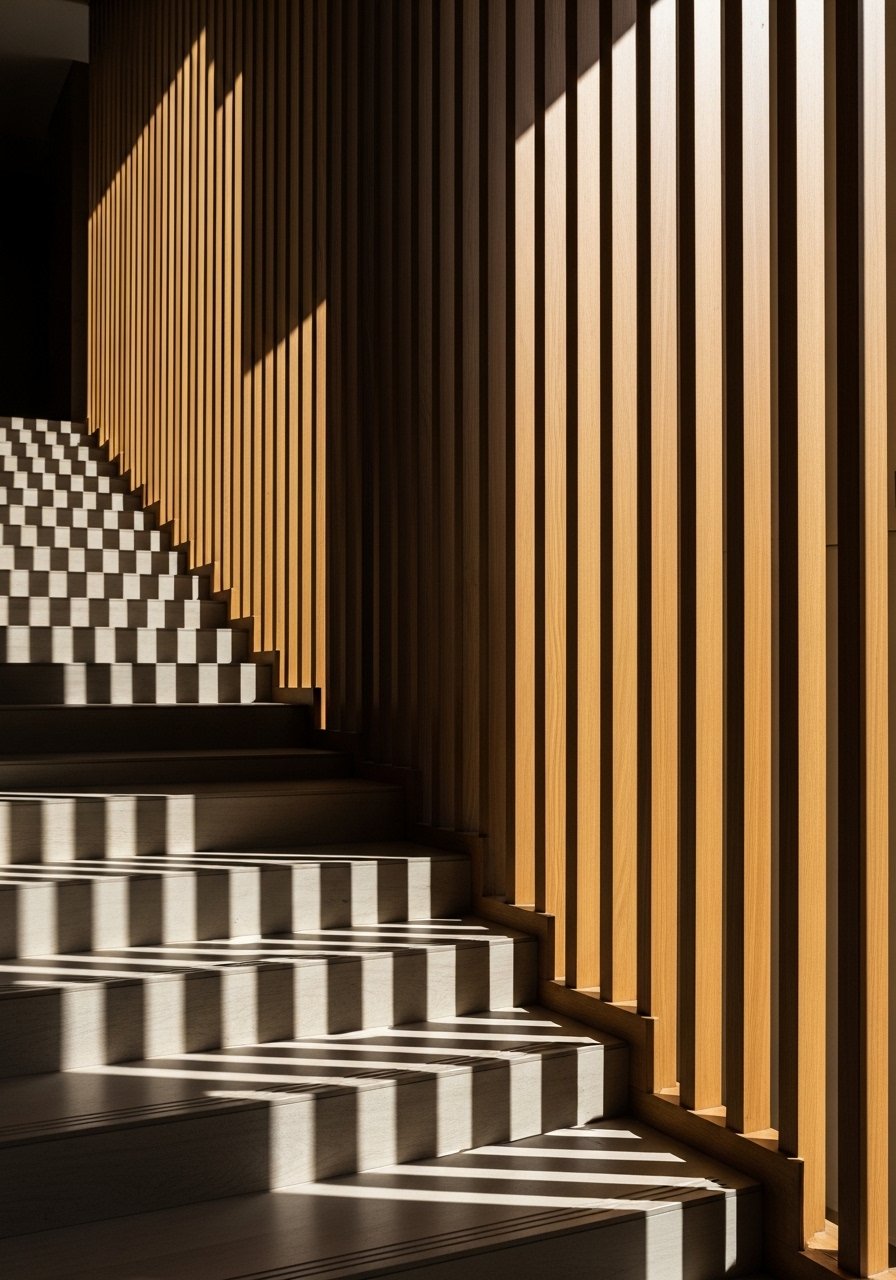
Running slats parallel to the staircase creates a custom architectural look. I installed 1.25-inch slats spaced 2 inches apart to mirror the stair riser height. Budget $80 to $150 for a single run. A common error is not planning the slat spacing against the stair slope. Mark the first and last slat before committing and use a temporary guide. This pairs well with the vertical slat hallway idea earlier and extends the design language. For clean installation use these wood slat fixer clips.
Kid-Friendly Chalkboard and Wood Combo in Playroom
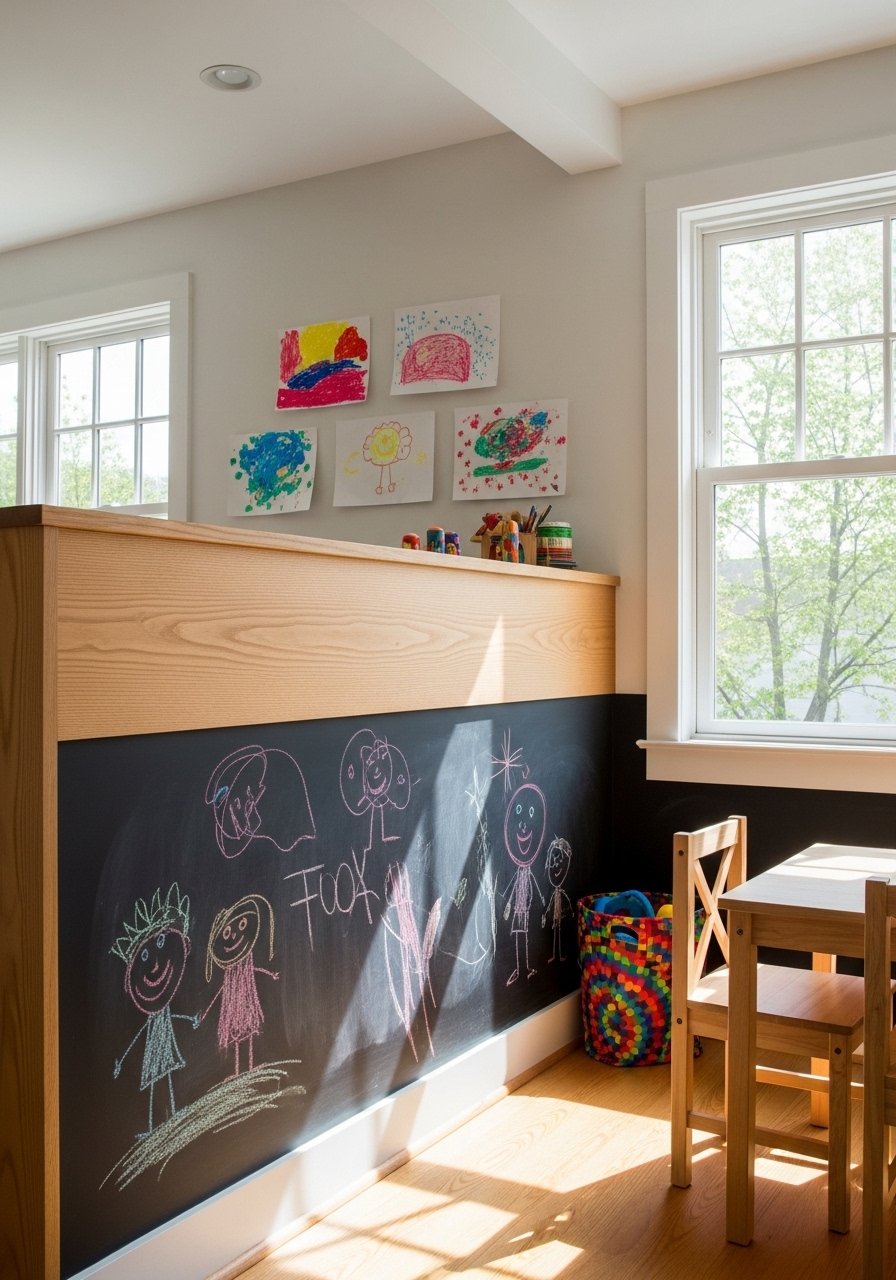
Half chalkboard, half wood is a lifesaver if you want durable play surfaces and a warm look. I covered the lower half with magnetic chalkboard paint and the upper half with 3.5-inch wood planks. Budget under $60. Mistake people make is using a glossy finish on the wood above art zones. Use satin finish so fingerprints are less visible. Keep the chalkboard at 36 inches high for easy reach and add a small ledge for chalk like this magnetic chalkboard panel.
Boho Macrame and Wood Panel Layering in Bedroom
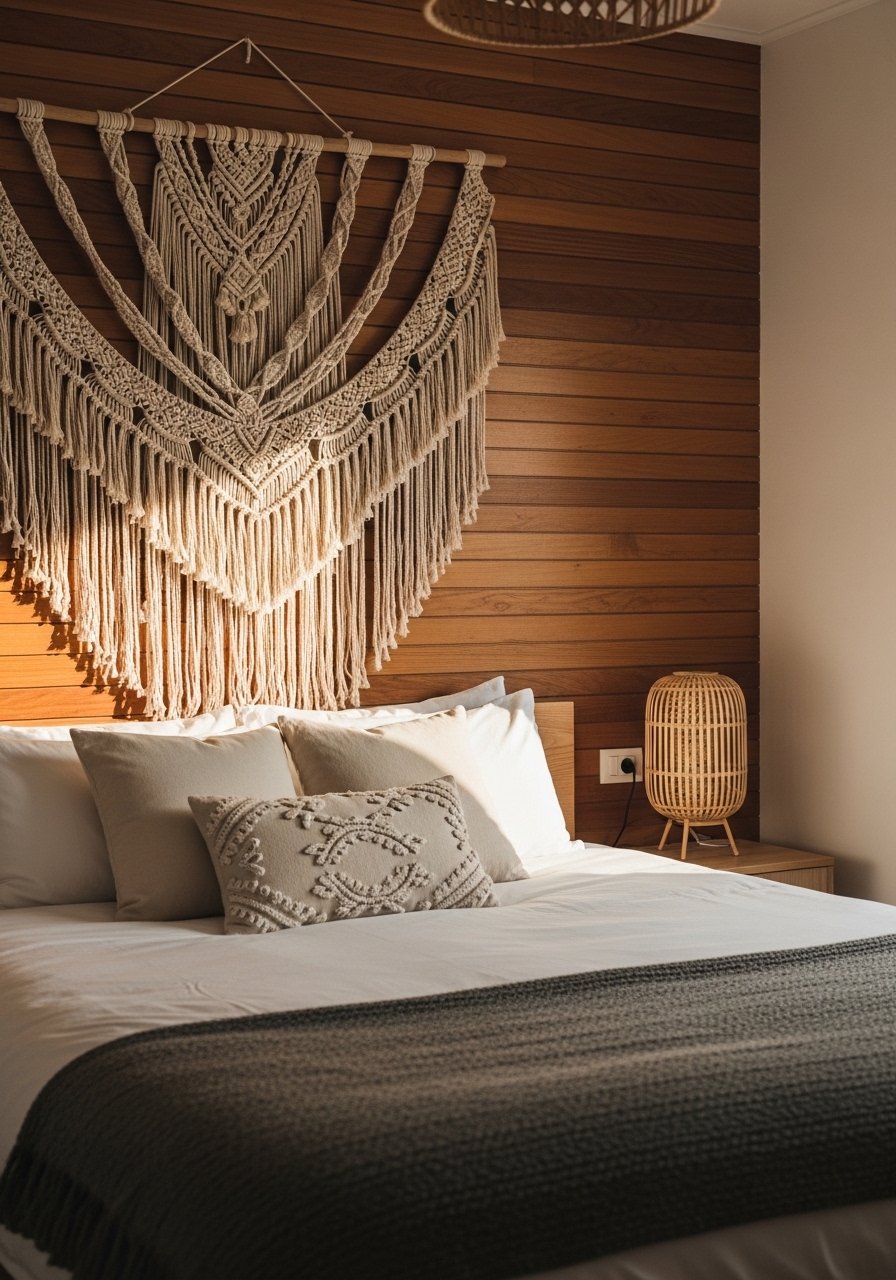
Layering a boho macrame over a simple wood panel makes the textile pop and hides imperfect wall texture. I used a 36-inch wood strip as a backdrop for a 36-inch macrame piece. Budget around $50 for both. A mistake is choosing a pattern that competes with the wood grain. Pick a simple knotting pattern and keep the wood tone light. For a balanced palette follow an 80/20 rule where 80 percent of the texture is neutral and 20 percent is color. Try this large macrame wall hanging.
Your Decor Shopping List
Textiles
- Honestly the best $35 I have spent. Chunky knit throw in cream 50×60 inches for sofas and beds.
- For layered pillows use 22-inch linen pillow covers, set of 2 in warm gray.
Wall Decor
- For trial runs pick peel and stick shiplap planks sold in 6-pack sheets.
- Mixed-width wood planks if you want authentic variation.
Shelving and Hardware
- White oak floating shelf 48-inch for media walls.
- Brass picture ledges 24-inch for easy gallery swaps.
Tools and Small Things
- Precision cutting tool for tight corners.
- Sturdy picture hanging kit for large panels.
Budget Finds
- Peel and stick wood-look tiles for bathroom accents, under $40 per pack.
- Similar picks at Target or HomeGoods for small decorative items like frames and bowls.
Shopping Tips
White oak beats dark wood in 2026. Design feeds have shifted completely. These white oak floating shelves look current, not dated.
Grab peel and stick shiplap planks for under $50 and try a 3-foot wide test patch before committing to a whole wall.
Curtains should puddle or kiss the floor, never hang halfway up. These 96-inch linen panels are right for standard 9-foot ceilings.
Lead with one large item, not five small ones. One 6-foot fiddle leaf fig has ten times the visual impact of a cluster of succulents.
If you are renting, use removable adhesive strips and test a small area of peel and stick wood before doing a full wall. Peel and stick planks sampler pack makes trial easy.
Frequently Asked Questions
Q: Can I use peel and stick wood planks in a rental?
A: Yes. Many products are designed to be removable and leave minimal residue. Test one plank in a hidden spot first. Use removable hanging strips for heavy panels and avoid gluing directly to drywall.
Q: Will peel and stick look like real wood up close?
A: It depends on the finish and plank width. Wider planks with matte finishes and visible grain read more like real wood. Try a sample pack and view it at arm length before committing.
Q: How do I hide seams on a large plank wall?
A: Stagger seams by at least 12 inches and use varying plank widths. Leave a tiny uniform gap and finish with a matching wood tone filler or paint. That helps the wall look like long continuous boards.
Q: Can I install these panels in a bathroom or near a sink?
A: Use water-rated peel and stick tiles in splash-prone areas and seal edges with waterproof silicone. Do not install standard peel and stick where it will receive direct shower spray.
Q: What size should a headboard wall be for a queen bed?
A: For a queen, aim for a panel that is 60 to 66 inches wide and 40 to 48 inches tall if it’s an oversized headboard wall. Sit the top 6 to 8 inches above pillows for comfortable scale.
Q: How do I avoid the "fake" look when using peel and stick planks?
A: Choose matte finishes, vary widths, and mix in a few real wood items like a shelf or frames. Keep 80 percent of tones neutral and 20 percent darker accents for depth.
Q: Can I mix real wood with peel and stick for a hybrid look?
A: Absolutely. Pairing a real floating shelf or beam with peel and stick panels adds authenticity and solves the budget problem while keeping the overall look convincing.

